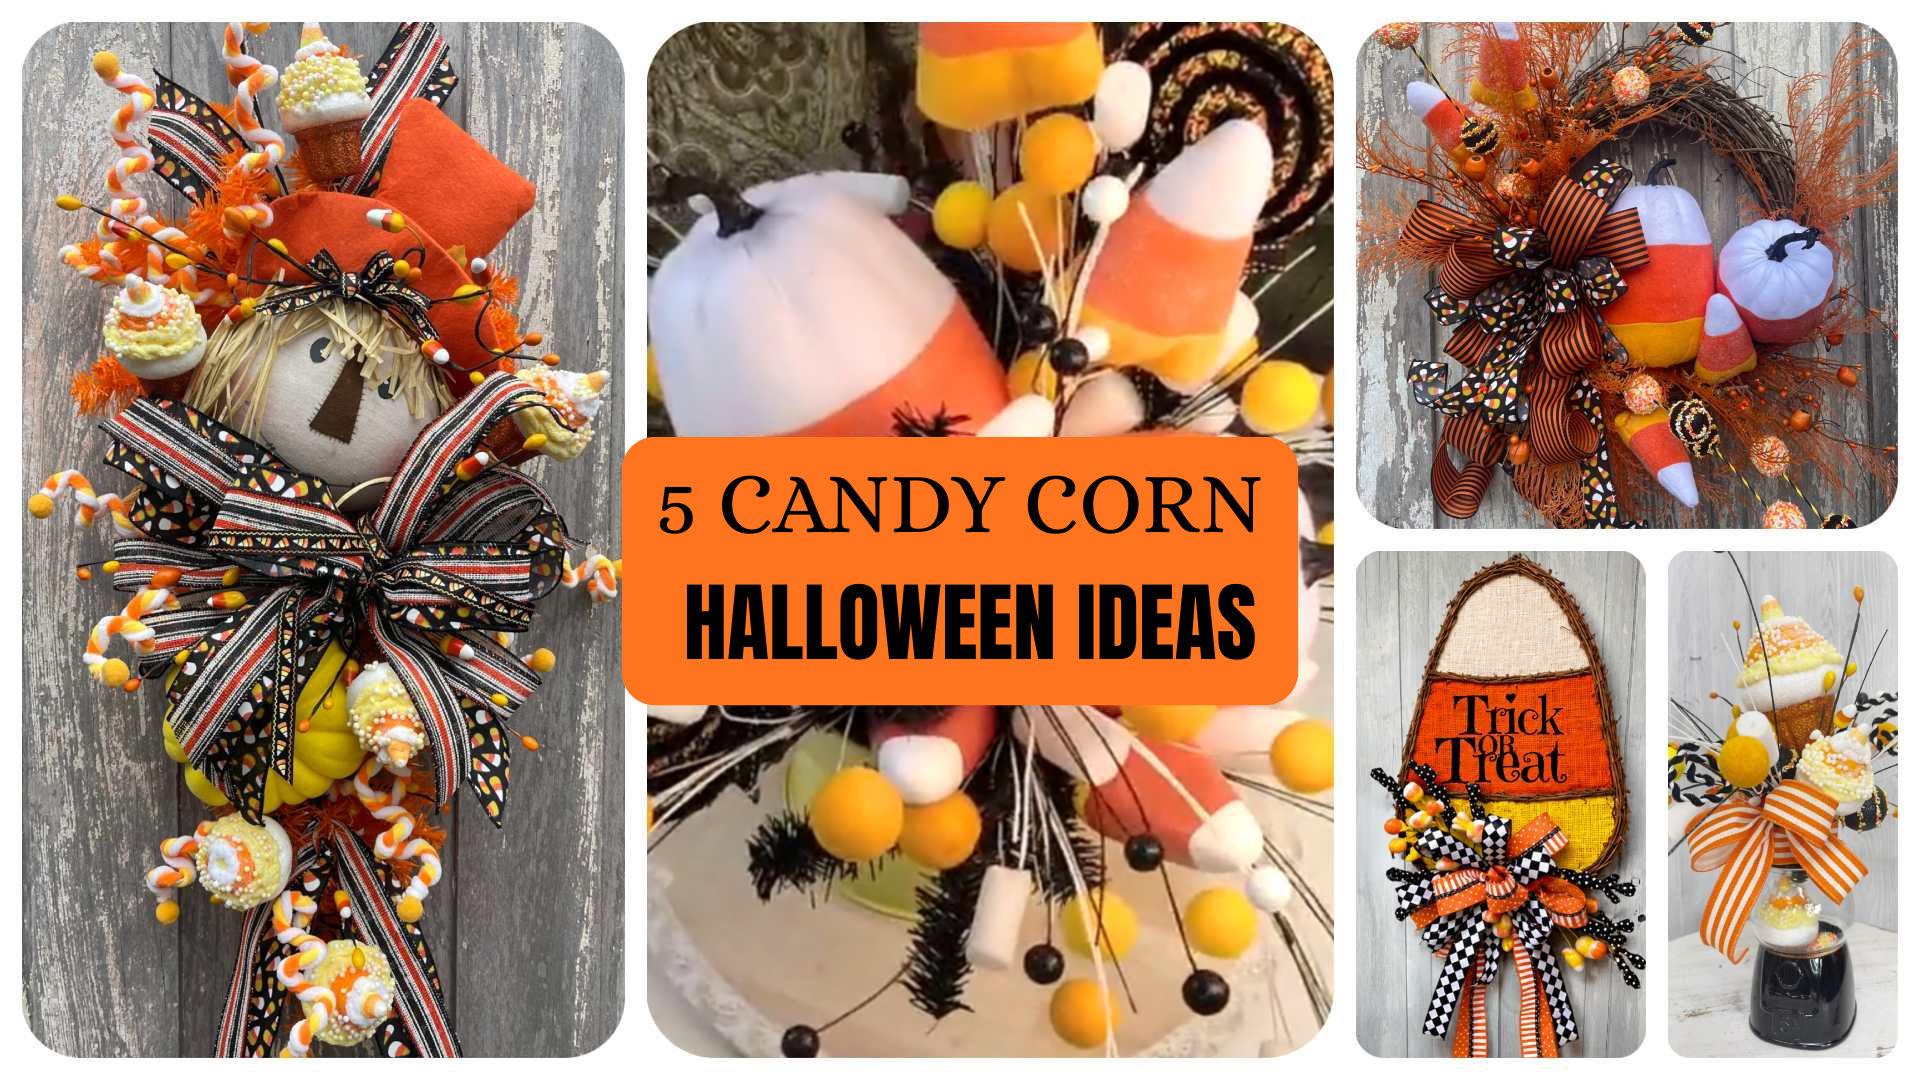
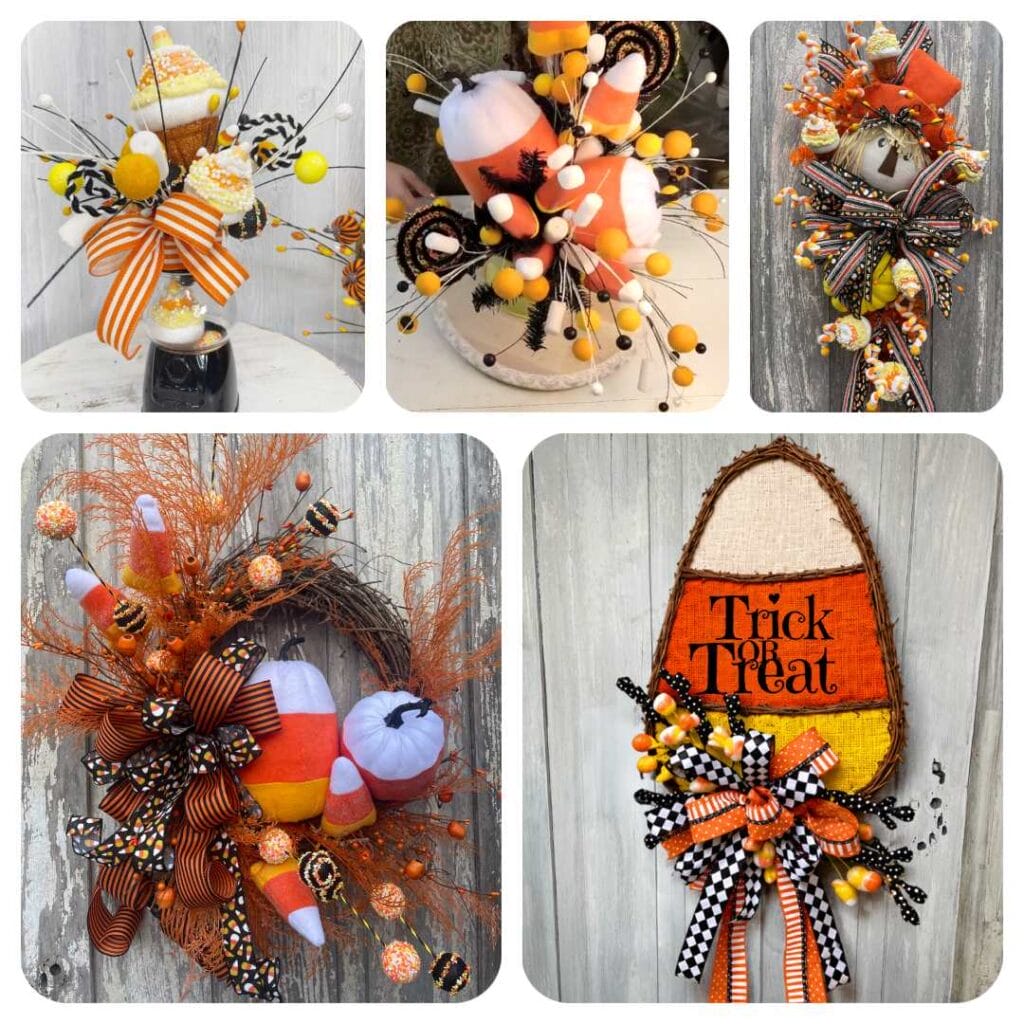
Candy corn Halloween decor is one of the easiest ways to bring playful color to your Halloween decorating without making things too spooky. Orange, yellow, white and black immediately say Halloween, and those colors work beautifully across wreaths, door hangers, centerpieces and other floral designs.
In this collection, Kelea shares five DIY candy corn Halloween decor ideas that take that familiar color palette in completely different directions.
You’ll see oversized candy corn, pumpkins, cupcakes, bows, berries and whimsical picks, but you’ll also learn floral design techniques you can use far beyond Halloween.
Kelea describes her Halloween decorating style as fun rather than overly creepy, which is exactly what ties these five projects together.
Looking for the supplies used throughout this collection?
Shop the Candy Corn Halloween Decor Supply List:
5 DIY Candy Corn Halloween Decor Ideas – Compilation 1617
5 Candy Corn Halloween Decor Ideas
What makes this collection especially useful is that you aren’t simply seeing the same design repeated on five different bases.
Instead, Kelea shows how a strong theme can be carried from one project to another while changing the shape, scale, mechanics and focal elements.
That means you can take the techniques you like and use them to develop your own candy corn Halloween decorations.
1. Whimsical Candy Corn Halloween Centerpiece
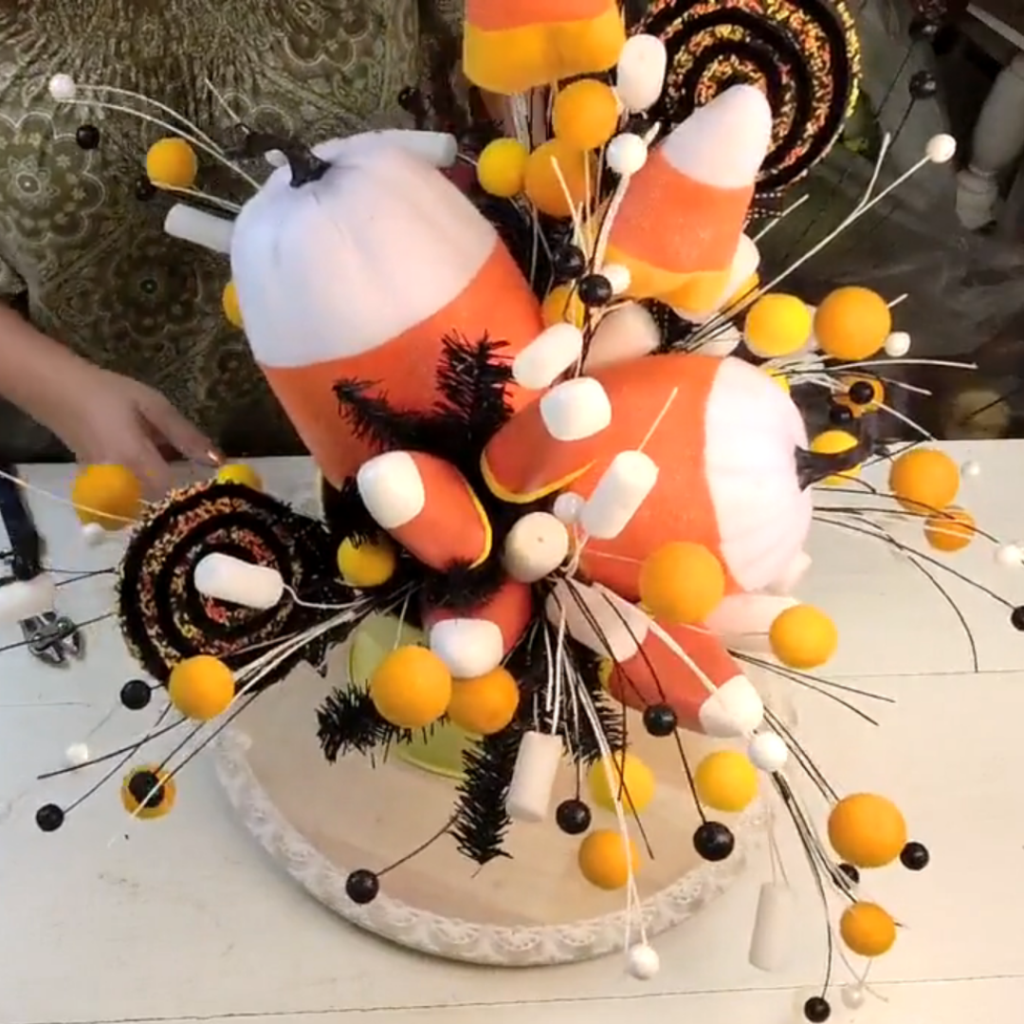
One of the most playful projects begins with a container and oversized focal elements, including pumpkins, candy corn and lollipops.
Rather than starting with lots of small filler, Kelea places the large pumpkins first. One moves toward the right and the other toward the left, immediately establishing the overall shape of the arrangement.
Start With the Biggest Elements
This is a technique worth remembering for almost any floral arrangement.
When you know your design contains oversized focal pieces, position those first.
They determine:
- how wide or tall the finished arrangement will become
- where your visual weight will sit
- how much space remains for smaller elements
- which direction the eye will travel through the design
Once those anchors are established, the smaller candy pieces become much easier to place.
Create Movement Instead of Simply Filling Space
The goal isn’t to pack every empty area.
Kelea describes creating the feeling of an explosion coming out of the center. Wired candy picks are shaped outward, upward and forward to create that movement.
That’s what keeps a whimsical design from becoming one big clump of decorations.
2. Candy Corn Trick or Treat Door Hanger
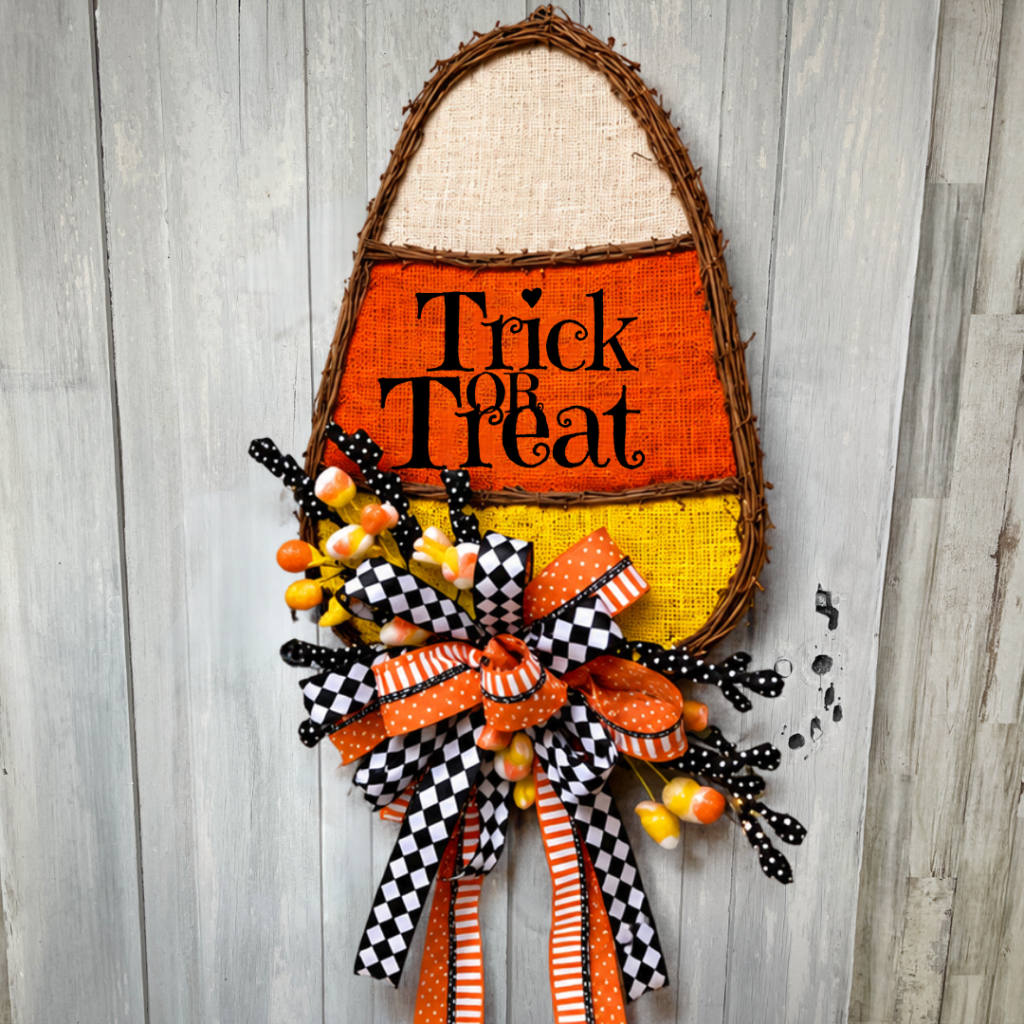
This project takes a completely different approach.
Instead of covering the entire candy corn-shaped base, the embellishments are concentrated near the bottom, allowing the Trick or Treat design itself to remain an important part of the finished piece.
The bow and candy picks become one coordinated cluster rather than separate decorations.
Build Your Bow From Back to Front
Kelea uses the wider ribbon as the foundation and layers narrower ribbon over it.
The important lesson isn’t the exact ribbon recipe. It’s understanding how different widths and patterns create depth.
Once the bow is fluffed, those individual layers should be visible instead of lying flat against one another.
Kelea explains that this movement and dimension are what help separate an average-looking bow from a more polished one.
Layer Picks Behind the Bow
The candy picks are arranged behind the bow with some elements forward and others farther back.
That difference in depth is intentional.
Instead of seeing:
pick + pick + bow
your eye sees one integrated focal area.
That same technique works beautifully for wreaths, swags and lantern bows.
3. Candy Corn Halloween Gumball Machine Centerpiece
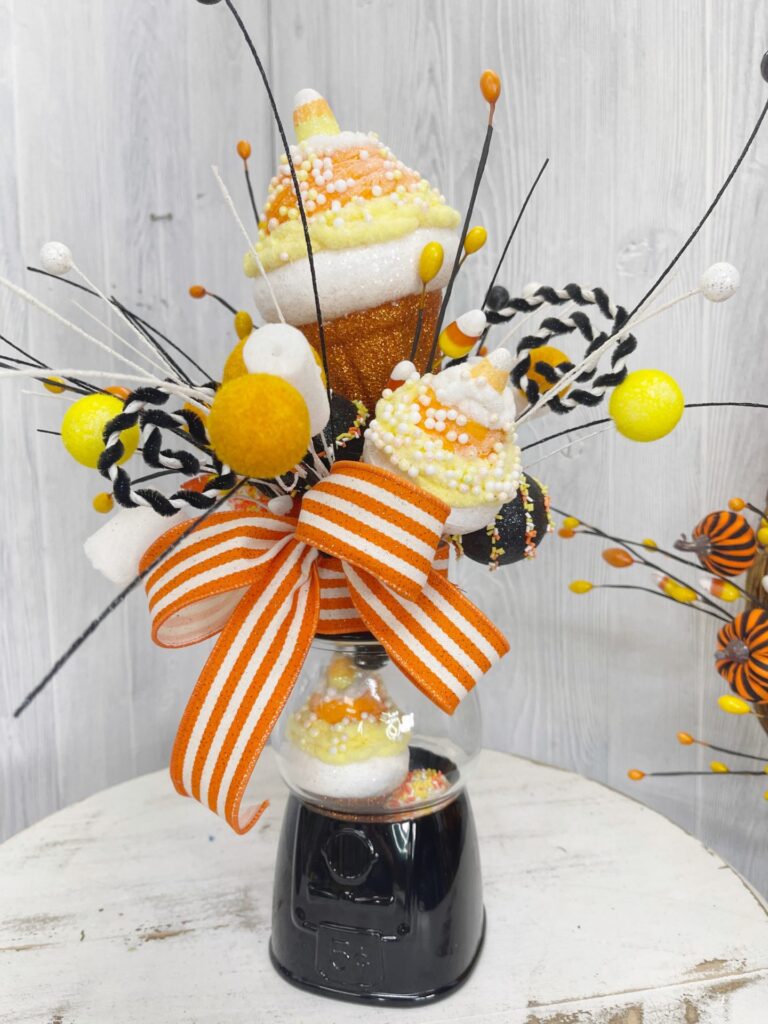
This might be one of the most unexpected candy corn Halloween decor ideas in the collection.
A glass gumball-style container becomes the base for a Halloween centerpiece filled with candy-inspired elements.
Kelea creates the floral portion on the lid rather than permanently filling the entire container with floral mechanics. That opens up possibilities for changing what’s inside the jar—or even creating interchangeable seasonal tops.
Break Large Picks Into Smaller Pieces
One of the best ways to get more control over a design is to stop treating every floral pick as one piece.
Kelea breaks larger candy picks into smaller sections and distributes them around the arrangement.
This gives you more control over:
- spacing
- color distribution
- height
- direction
- visual balance
It can also help you get considerably more design mileage out of one decorative pick.
Design in a Pattern
Kelea compares the placement around this centerpiece to synchronized swimmers or a fountain.
The pieces radiate around the design while leaving space for the large cupcake focal element in the center.
That gives the arrangement structure even though the materials themselves are playful.
4. Candy Corn Scarecrow Halloween Swag
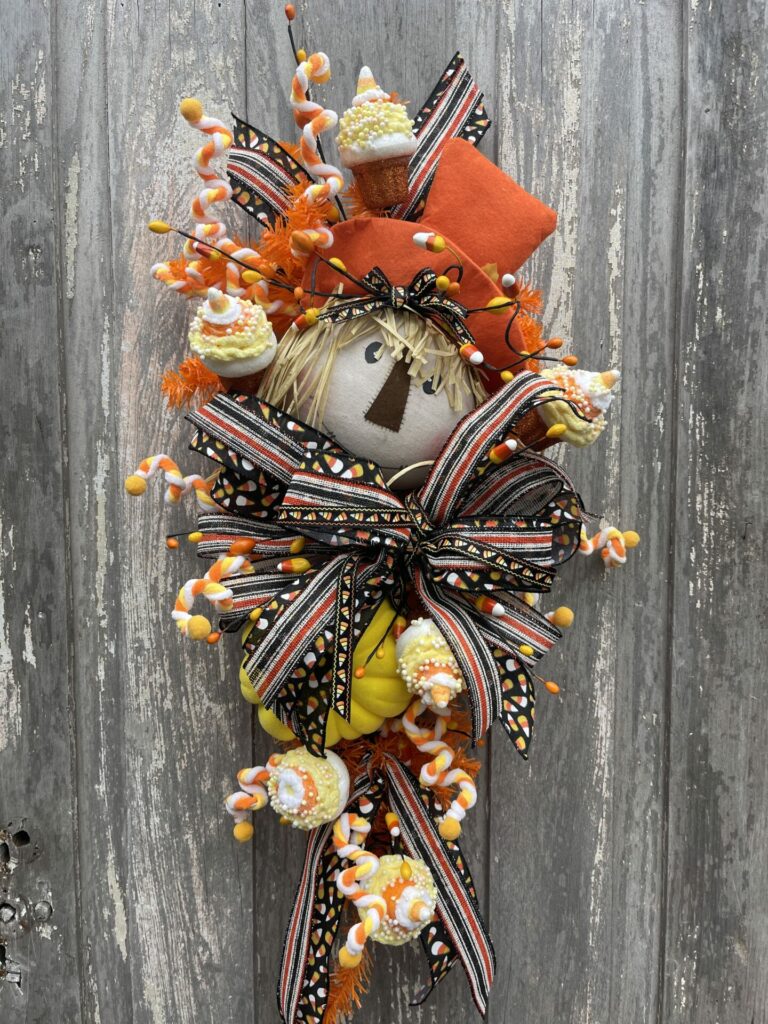
This candy corn-inspired swag combines a scarecrow, bright pumpkin, ribbon and whimsical accents on an orange base.
Because the base already supplies so much color, Kelea begins with the two largest focal elements and works everything else around them.
The scarecrow and pumpkin are intentionally positioned in opposing directions to begin establishing flow through the design.
Alternate Direction to Create Flow
Rather than lining the large elements up vertically, Kelea works them in opposite directions.
That creates a visual path through the swag.
This is especially important with long designs because the viewer’s eye needs somewhere to go.
Leave a Bow Zone
Before adding every floral and pick, Kelea intentionally leaves an open area for the bow.
She calls this the bow zone.
This is such a simple technique, but it solves a common problem: building an entire design and then realizing there isn’t a natural place for the bow.
Plan the bow as part of the composition from the beginning.
Use Two Methods of Attachment
Kelea also emphasizes mechanics throughout this project.
The whimsical curls are attached with glue and secured with the pine from the swag. Using more than one attachment method helps the finished design withstand handling and gives sellers additional confidence that a piece can survive transportation and craft-show use.
5. Candy Corn Pumpkin Halloween Wreath
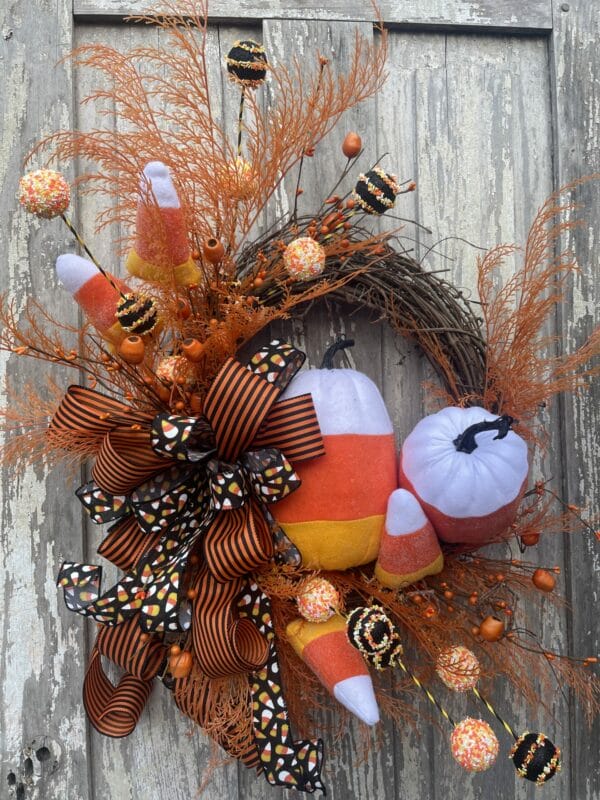
The final project shows how candy corn colors can inspire a Halloween design without requiring every element to literally be shaped like candy corn.
Large pumpkins establish the focal area while orange greenery, candy accents, ribbon, berries and wispy materials build around them.
Establish Your Focal Pieces Before Hiding the Mechanics
Kelea positions the pumpkins first and then evaluates where the attachment points need to be covered.
This is an important distinction.
Don’t automatically start hiding mechanics before you know where your focal elements belong.
Once the large pieces are secure, greenery can be positioned exactly where it’s needed. Kelea specifically explains that she doesn’t want the supporting mechanics visible, so greenery is used to camouflage those areas.
Mix Textures for a More Interesting Design
This project combines several finishes rather than repeating one texture throughout the wreath.
There are berries, wispy greenery, glittered candy pieces, ribbon and matte elements.
Kelea points out how mixing shiny, glittered and matte textures gives the design additional interest.
That lesson works for nearly any seasonal floral design.
How to Make Whimsical Halloween Decor Look More Polished
Whimsical does not have to mean chaotic.
These five projects use lots of candy, curls, pumpkins, ribbon and bright colors, but there are still design principles controlling where everything goes.
Here are some of the most useful ideas to take from this collection.
Shape Every Wired Stem Before You Use It
Kelea often calls this “shaking hands” with the material.
Instead of using a wired pick exactly as it comes out of the package, open it, separate the branches and manipulate the wires.
A compressed pick can become considerably larger and more dimensional with a little shaping.
That small step can make a major difference in the finished design.
Use Depth, Not Just Width
Not every piece should sit on the same plane.
Some elements can move forward. Others can sit deeper. Still others can extend beyond the main silhouette.
That layering is what gives a design dimension.
Repeat Color Throughout the Design
The orange, yellow, white and black palette appears repeatedly in these projects.
If you introduce black at the top of a design, for example, consider where a smaller touch of black could appear somewhere else.
Repetition helps even wildly different materials feel like they belong together.
Hide Mechanics Strategically
Mechanics don’t always have to be hidden with moss.
Ribbon, greenery, berries, candy picks and other decorative materials can camouflage attachment points while contributing to the overall design.
In the gumball-machine project, for example, orange ribbon is used to conceal floral foam while also reinforcing the orange in the design.
Let Large Elements Do Some of the Work
Oversized pumpkins, candy corn and cupcakes fill space quickly.
That’s useful.
Instead of adding dozens of small pieces to create impact, establish your large focal elements and then use smaller materials to support them.
Candy Corn Colors Aren’t Just for Candy
One reason this theme works so well is that you don’t have to use literal candy corn everywhere.
Think of candy corn as a color palette:
Orange + yellow + white + black
Once you start there, you can bring in pumpkins, sunflowers, berries, ribbon, scarecrows, cupcakes or other Halloween accents.
That’s also why the five projects in this collection look coordinated without looking identical.
Make Your Halloween Designs Your Own
You don’t have to reproduce every project exactly as Kelea makes it.
Start by following the placement if you’re learning. As you become more comfortable, change the bow, substitute a focal element or move the embellishments to create a version that fits your own decorating style.
That’s something Kelea specifically encourages: learn the how and why first, then start adding your own twist as your confidence grows.
Learn the Why Behind Floral Design
If you’ve ever looked at a finished wreath or arrangement and thought, I like it, but I don’t know why it works, that’s where understanding floral design principles becomes so valuable.
Kelea’s Design School goes beyond simply copying a finished project. Kelea teaches the how, why, when and where behind placement so you can understand how to make your own design decisions.
Learn more about Kelea’s Design School
Frequently Asked Questions About Candy Corn Halloween Decor
What colors work best for candy corn Halloween decor?
Traditional orange, yellow and white immediately create the candy corn look. Adding black gives the palette more contrast and connects it to traditional Halloween decorating.
Can I make candy corn decor without using actual candy corn decorations?
Absolutely. Use the candy corn color palette as inspiration and incorporate pumpkins, florals, berries, ribbon and other seasonal elements.
How do I keep whimsical Halloween decor from looking cluttered?
Start with your largest focal elements, establish the overall shape, leave intentional open areas for major components such as bows, and then layer smaller pieces at different depths.
Can I break floral picks apart?
Many wired floral picks can be divided into smaller sections. Kelea uses this technique throughout these projects to gain more control over placement and distribute color and texture throughout a design.
How can I make Halloween floral designs look more professional?
Pay attention to mechanics, movement, depth and finishing. Shape wired materials before placing them, securely attach major focal pieces, camouflage mechanics and avoid putting every element on the same visual plane.
Are candy corn decorations only for front doors?
Not at all. This collection includes ideas suitable for doors, tables, mantels and other areas of the home. The gumball-machine arrangement, for example, was designed with mantels and kitchen accent areas in mind.
Create Your Own Candy Corn Halloween Decor
Whether you love a big whimsical wreath, an easy door hanger or a candy-filled centerpiece, you can use the same basic design principles throughout your Halloween decorating.
Start with your largest elements. Establish your shape. Create movement. Layer materials at different depths. Repeat your colors. And don’t forget to shape those wired stems before they ever go into the design.
Most importantly, use these candy corn Halloween decor ideas as inspiration rather than a rulebook.
Choose your favorite project—or borrow a technique from several—and create something that feels like you.
Ready to see the supplies used in these designs?
See Compilation 1617 and the Candy Corn Halloween Decor Supply List