Blue is the color of Fall this year! It’s the perfect hue to add some seasonal cheer to your front door. In this tutorial, you’ll learn how to make a blue fall wreath using the perfect supplies I have gathered from my shop. So get ready to deck out your home for Fall!
Rustic Glam Blue Fall Wreath
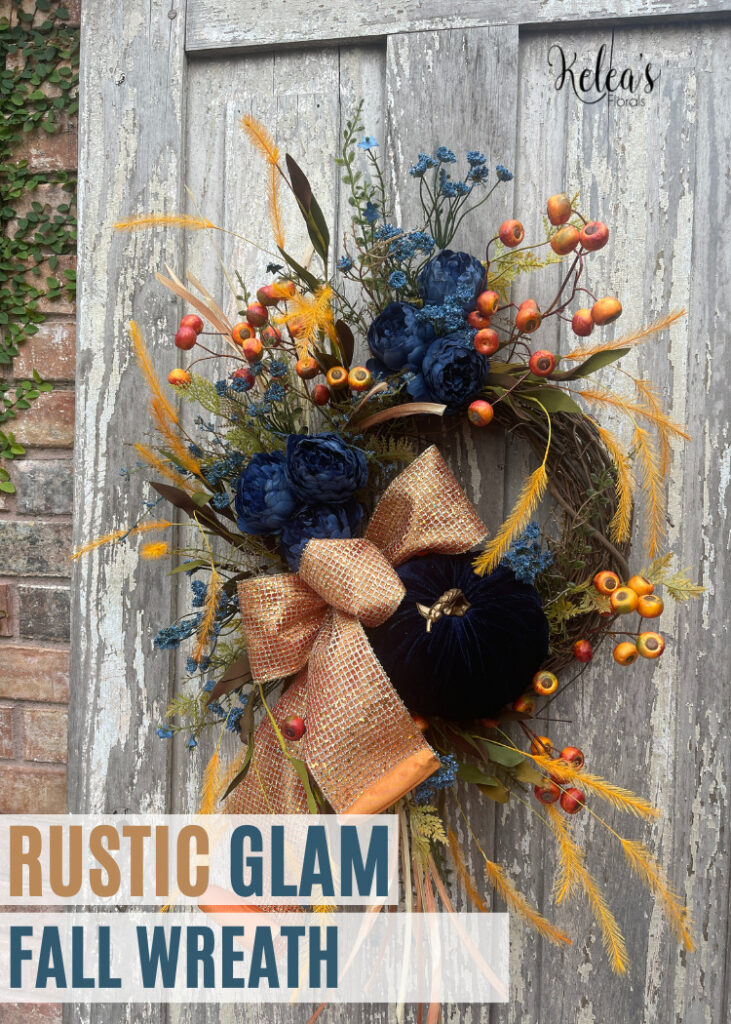
I am going ga ga for this beautiful combo of classic fall colors paired with beautiful blues found in this amazing Rustic Glam Fall Wreath. I just can’t say enough about this gorgeous velvet pumpkin that catches the eye of anyone who walks by. Oh, and the deep blue peonies… Simply gorgeous. Isn’t that our hope for making a beautiful wreath, to create something that is beautiful and eye-appealing?
Creating DIY wreaths with high-quality florals, that stand out from those you might find premade, at some of those chain craft stores is what I teach here at Kelea’s.
No matter the size, style, design, color scheme, or vision, I am here to help you get the desired look you want. With so many different tutorials, tips, and tricks, you can’t go wrong. I take it back. You can go wrong if you decide not to try to make this beautiful DIY fall wreath with me right now. That would definitely be wrong.
The high-end quality florals and greenery are not the only reasons why my wreaths are so pretty. When creating a wreath, I make sure it is full of movement, texture, and depth.
Creating all of those features is also why it sets itself apart from those boring flat door screen wreath people. Which, you are most certainly not, right? Having your florals, greenery, and embellishments, like this pretty pumpkin, pop from your grapevine base, is an important part of making something beautiful. It is not hard to do either. Let me show you how using these supplies!
Ingredients
Navy Blue Velvet Pumpkin
4″ Platinum/Orange Taffeta Glitter Mesh Ribbon
Orange Feather Bush
Blue Dry Peony Bush
Directions
- Grab your 14” grapevine and prop up on your Wreath Design Stand for the easiest way to create. Apply a hanger to the back for easy hanging later on once complete.
- Let’s start with inserting your Navy Blue Velvet Pumpkin. Insert your wooden dowels, with hot glue on the end, through your grapevine up through the bottom. Push it into your pumpkin to secure it in place. Add a second skewer at a different angle to secure using the leverage technique. Trim the excess of your wooden dowel with wire cutters/scissors. Don’t worry about the mechanics showing. We will hide those in a bit.
- To create your shape, grab your beautiful Blue Filler Bush Greenery and begin to set the perimeter for your wreath. Remember to maintain the angles for your wreath as you add.
- Break your greenery into sections, making it nice and full. Continue placing it in, spacing it out and around on your wreath. Be sure to “Shake hands” with each piece before you add.
- Make sure your placement stands out with movement, texture and depth with your placement of greenery.
- Let’s work in your Blue Dry Peony Bushes. Adjust your florals to the head and remove the greenery from the stem. (Save the leaves for another project for sure.) Insert your peony, pushed into the grapevine with a bit of a bend so the floral comes forward to continue creating that depth.
- Add in clusters of 3 with your peony florals. Add to support the previous filler bush you just placed.
- To fill in a small bald spot above the pumpkin, I simply removed some greenery pieces from the other placed filler bushes that could stand to be trimmed. Add a bit of a cluster and hot glue on ends to work into place. No need for a pick machine y’all. Hide your mechanics with some spanish moss.
- Next let’s add your pop of fall color with your Fall Orange and Yellow Berry Stem. Insert back behind your filler and first peony cluster. Adjust your wired berry stem to make them really stand out. Add here and there to support your blue touches.
- Let’s add your premade gorgeous bow next. I enjoy the drama from the long tails on our bow. Secure your bow with your cable tie through the grapevine. Pull tight and trim excess.
- Maneuver and manipulate your bow to work behind your pumpkin and through the greenery. Curl your wired ribbon tails too to continue with your rustic glam look.
- To continue with the fall tone, let’s add your Orange Feather Bush. Work pieces into the grapevine by creating a flow for your wreath. Keeping that continued direction of your grapevine is important. These feathers are replacing the traditional twigs that I use when making my other wreaths.
- Take a step back and fill in any spots, adjust any florals, greenery, and the bow where needed. Then give yourself a pat on the back for creating this beauty.
How Do You Set the Perimeter of a Wreath?
I love to set the perimeter of my wreath to determine how big or how small it will be by creating a firm base with my greenery bushes to start. This specific wreath was made on a smaller base, 14” grapevine wreath.
But that smaller size didn’t stop me from creating a big, full, vibrant gorgeous fall wreath because I set the perimeter with my filler bush. When you are creating your wreaths, have a visual game plan to start. You do not have to have your wreath be as large as mine. You do what works best for your space, your client, and you overall.
What Method Should You Use to Mount a Large Embellishment To A Wreath?
This deep blue pumpkin is so gorgeous, but it definitely won’t be if it falls out of your wreath. So mounting it securely is very important. I like to use leverage as I add with my wooden dowels to secure it in place best. You know, like the science lesson you had back in school. (Def: the exertion of force by means of a lever or an object used in the manner of a lever.) Hot glue on those ends and really working it securely into the grapevine as well is key. That pumpkin, or whatever you add to your wreath won’t be falling to the floor for sure!
How to Make a Wreath Fall
The best way to make a wreath fall theme is to add some autumn colors like orange and red leaves. You can even get trendy and add some blue to your fall wreath as I did with this blue fall wreath. You don’t have to stick to the traditional orange. Gather up some color-coordinating stems and greenery and you will be set to make the best wreath fall themed you can make.
Are you searching for a unique DIY project this Halloween? Look no further than the Frankie Centerpiece Kit, perfect for adding a personalized and cute spooky touch to your Halloween decor. This DIY arrangement kit blends creativity with simplicity, making it an ideal craft for all skill levels.
DIY Frankie Centerpiece for Halloween Home Decor
Crafting your centerpiece is straightforward and enjoyable. You’ll need some basic tools like styrofoam, wire cutters, scissors, and hot glue. Begin by setting styrofoam inside the bucket, strategically place the twig sprays and, and use the eyeball picks for a finishing touch of flair.

Let me show you how to create your own DIY Frankenstein Halloween Centerpiece that is a cute not spooky decoration for Halloween. Mixing your spooky decorations with old and new gives you fun times spent crafting together now while reminiscing about the Halloweve of yester years. It’s a wonderful way to start a family tradition or simply enjoy some seasonal crafting magic.
Ingredients
Directions
- Start by finding cutting the styrofoam so it is nestled inside of the Green Frankenstein Bucket so that it sits nicely inside and glue down. I like to use both Gorilla Glue and Hot Glue to really secure it for both now and long term.
- Cut Black Garland Base into small sections and set your base, spreading for maximum coverage.
- Prep your picks by grabbing your Purple Green Orange Felt Ball Twig Sprays. Sseparating them into smaller picks. You can also twist the black chenille around your finger to create a fun effect.
- Trim your Glitter Eye Ball Picks and add to the stryofoam. Be sure to space them for the best visual display.
- Cut and prep the White Black Chenille Curly Stems add some dimension to them by curling with your fingers to really give them life.
- Stem back and look at your your centerpiece. Are thier bald or blank spaces? Fluff you black garland to fill and use the wires in your products from Keleas.com to really get the pieces where you want them.
- Grab one of your Glitter Curly Velvet Ball Picks and trim the stem down to a couple of inches. Fluff out your pick, and then place it to the left of your bow, tucking it behind the bow to have it peek out from behind it.


