Are you ready for Christmas? I sure am! I just finished decorating all my trees, All I have left to add are the tree topper bows so thought I would share with you how to add the perfect bow for the top of your Christmas tree.
Yes, you read that right, all my tress! I just love decorating for Christmas and really enjoy putting up different trees around my home. This helps everyone get what they want!

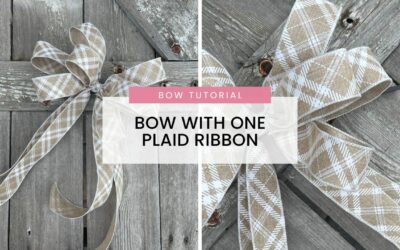
How to Make a Tree Topper Bow for a 7-Foot Tree
Tree topper bows are usually a beautiful statement piece for those lush, tall Christmas trees. Use this tree topper bow design and add that wow factor into your tree to really shine without going overboard.
What type of ribbon do I need for a tree topper bow?
Other supplies and tools you’ll need to create your tree topper bow
- Cable Tie
- EZ bow maker
- Wire cutters
- Scissors
- Tinsel green stem
What size are the loops for the tree topper bow?
For this tree topper bow, you’ll be making 7-inch loops to start with and gradually making them smaller.
Your loops will go from 7″ to 6.5″ to 6″ to 5.75″ for this design.

DIY Tree Topper Bow
Difficulty: EasyStep up your Christmas decorating with this DIY tree topper bow tutorial. You’ll take that Christmas tree to a whole new designer level!
Ingredients
- Supplies and Tools**
1 – 2.5″ wired ribbon
1 – 1.5″ wired ribbon
Cable Tie
EZ bow maker
Wire cutters
Scissors
Tinsel green stem
Directions
- Start by measuring out 40 inches of ribbon for your tail, pull tail forward and twist it
- Measure out 7 inches and twist, then repeat.
- Fluff the loops out as you make them.
- Make 5 loops at 7 inches on each side.
- Measure out your tail 40″ and cut.
- Now you have a tail up and a tail down and 5 loops on each side.
- Come in now with a coordinating color ribbon
- With this one make the tail the same exact length to match.
- Start it opposite of the other tail to get spacing with your tails
- Measure out 40 inches and twist and put in the center of the bow maker
- For the coordinating ribbon color, you will only be making 4 loops
- Measure out your loop to be 6.5 inches and twist, you should have 2 loops now
- You should repeat this until you have 4 loops on each side.
- Fluff your bow loops as you make them.
- Every time you come back to the middle until you get to your last one you measure it out to the same exact length of your previous tail. Just like with the first ribbon you have one tail up and one tail down.
- Now you grab your first ribbon pattern back and measure your tail 40 inches and twist in the middle
- This time you are doing 3 loops with the first ribbon making 6-inch loops, making 3 on each side.
- Be sure to keep fluffing the loops out and positioning them as you make your loops by twisting.
- Making sure all your tails are the same length and positioning them
- Grab your second ribbon color and measure your tail out the same length and twist
- Make your loops 5 3/4 and making 3 loops on each side.
- Just like with all the other tails measure this tail out 40 inches.
- Take a tinsel green stem and a 14 inches cable tie, slid it underneath your center and pull up and connect your cable tie and pull it a little tight
- Place your tinsel green stem you will use this to attach to your tree. Slide it into the back of the cable tie.
- Don’t let go of the center you want to keep holding pressure
- Start fluffing and make sure your tails are spaced out and start putting loops between loops
- You should start seeing your tree topper filling out and looking fabulous
- Now tighten your cable tie as tight as you can get it
- Take wire cutters and cut the excess of your cable tie off
- You can place a little piece of ribbon and cover the center of the mechanics of the bow. This helps it look very professional.
Recipe Video
How to attach your tree topper bow to a Christmas tree
- Make sure you can see the very top of your tree
- Organize your tails and grab the piece where you are attaching
- Place your bow facing towards the top (ceiling)
- Pull your tails down and pull them down, fix your loops and fluff
- Now spread your tails out and place them where you want them, you can feed them through your tree, or you can twirl them down.
- Once you have it all pretty take your added tinsel green stem that you put in the back of your bow just secure it to the top of your tree by twisting it around till it is tight and secured.
Be sure to share with us in the comments the tree toppers you have made this Christmas Season!