Ready to have a holly jolly time and learn how to create a beautiful Christmas Red Berry Swag? You are in luck I am showing you all the tips and tricks to create your very own red berry swag today!
It’s beginning to look a lot like Christmas, everywhere I go. Especially in my Bloom Room y’all! Give me all the reds of beautiful berries. All the pretty greenery, both flocked and not flocked.
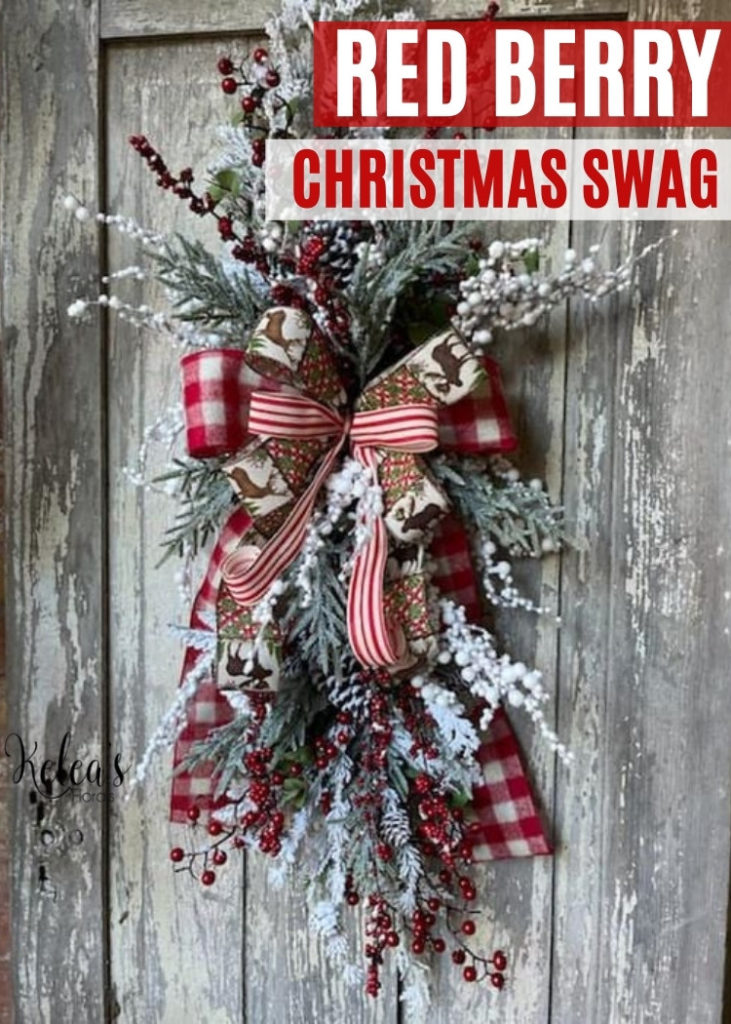
The large Christmas-themed ribbon makes a beautiful festive bow with loops and tails of all sizes. Oh, and give me the pine found on a simple little swag to make my heart swoon.
How could it not look like Christmas up in here with all of these beautiful elements? It just couldn’t! Are you ready to get work, creating this amazing Christmas Red Berry Swag? I know I am.
Christmas Red Berry Swag
I have wanted to work with some of these beautiful pieces for quite some time now. I am so excited I get to today. Can we talk about the pops of red berries and the stark white snowy garland, all laying on a bed of beautiful greenery? Y’all know how I love to play with flowers, but these elements… well. They are like a Christmas present come early for me. And you know I love a pretty present too. Who doesn’t?
So come along with me, as I teach you how to create a beautiful swag, that seems larger than life. In this tutorial, you will learn how to manipulate and work with all sorts of products from sprays and stems, to berries and bows. I know we are going to have a holly, jolly time all while creating this one-of-a-kind Christmas Red Berry Swag. Did I mention how cute this would also be as a centerpiece on a large dining table? It would be BERRY, BERRY cute.
I am here to teach and guide you through it as you follow along with my step-by-step instructions. I will help you learn a few techniques to improve your swag-making skills or maybe even start on your very first one! When you are done, you will be thinking to yourself, “What style swag can I make next?” I can answer that question and many more in my design school. Be sure to check it out to learn all about all sorts of fun designs.
Join the waitlist to know when it opens up again and you can learn more techniques when it comes to making your own floral and decorative holiday designs.
This is a simple project and you can have a one-of-a-kind winter decor in little to no time. Be sure to grab your supplies and follow along with me in the tutorial video! Just remember to have some fun and check back soon for new videos and instructions.
Ingredients
Directions
- Grab your Medium Green 24” Swag Base. Get it fluffed out and flat so we have a nice big base of green pine to work with. I like to call this shaking hands.
- Using our premade rustic Christmas-themed bows, let’s determine where to get tit added by playing with placement first. I like to have a visual game plan before I begin. You should too! Set aside once you have found the perfect spot.
- If you aren’t sure how to make your bows, no worries. Check out this tutorial on How to Make Large Christmas Bows! We have enough to stress about during the holiday season. Let’s not add bow-making to the list… I got you, my festive friend!
- Grab your Snow White Berry Garland. Let’s get it cut up into pieces. Use your wire cutters. Set aside to work with later.
- To create the image of our swag being larger than life, we will use a couple of beautiful sprays on the ends. Grab your 2 Flocked Pine Sprays. We will add 1 at the top and 1 at the bottom of our swag. Fluff it out and let’s create some pretty shapes.
- Work that 1st spray into the swag, by twisting it in the pine tines to place it. I add a bit of hot glue to make it extra secure as well. Just use a dab of hot glue on a stick so it doesn’t drip too much all over the swag.
- Add your 2nd swag towards the bottom, keeping in mind that our large bow will be our center focal point. Doesn’t it look so much bigger now?
- Let’s add those Snow White Berry Garland pieces we cut up earlier. We will add a little to the top and bottom accenting the sprays you just added. Dipping the stems into hot glue, you can also use the pine tines to help secure it in as well.
- Fill in the middle just a little as you work, remembering that your bow will be placed in the center.
- Grab your Red Berry with Leaves Stem and “Shake Hands” with it to fluff it up. Trim excess stem and then cut that stem into 2 pieces to work with. Dip into the hot glue and add to the swag. Layer your red berries up top by pushing them down into your swag. Accenting the white spray already added.
- Repeat with your next red berry stem, down below on your swag. Try to balance it out as you add.
- Next, let’s add our Flocked Cedar Bush. It is a different shade of green, which will add some contrast to the dark green and stark white we already have used. Trim pieces from the main bundle. Attach with hot glue throughout your swag here and there.
- With our large 4” Christmas bow, attach it to the center of the swag. Place it a bit higher so the tails cover some of that green swag base. The cable tie may need to be wrapped around the back of swag instead of being wrapped through since it is so thick. That is fine, just not my normal move.
- Once secure on your swag, add some love to the ribbon tails. Curl those up, still maintaining some length to hang down.
- This looks beautiful as is, but I think a little more red is always fun. Cut sections from your Snow Red Berry Branches. Dip ends into your hot glue and work into your swag, popping out from behind your large bow. Just a new pop of color, texture, and dimension. Add some going up top and full on the bottom of your swag as well.
- Fill in any gaps with bits of your Flocked Cedar Bush and your Snow White Berry Garlands. If you need to trim them down a little bit, that is fine.
- Fluff any loops, curl those tails. Fill in any gaps. And then fall in love with your festive Christmas Red Berry Swag. I told you it would be BERRY pretty.
Want to learn more?
Join the free Facebook group Keleas Bloomarino Buds Wreath Making Community


