A candy corn door hanger is such a fun way to decorate your front door for Halloween—especially if you love the sweeter side of the season.
Instead of spooky ghosts and creepy creatures, this project combines an oversized candy corn base with black and orange ribbon, whimsical candy picks and curly accents for a playful Trick or Treat look.
And here’s what makes this project especially fun: the florals and picks aren’t simply added around the bow after it’s finished. Kelea builds them into the design so the bow and embellishments become one dimensional focal piece.
Ready to make it?
[Shop the Candy Corn Trick or Treat Door Hanger Kit]
Watch the complete tutorial:
Learn the Techniques Behind the Project
This may be an easy Halloween project, but there are several floral-design principles hiding inside it.
Kelea shows you how to layer ribbon, create movement in a bow, build depth with whimsical picks, balance a door hanger and securely attach a complete focal cluster.
Inside Kelea’s Design School, you’ll learn more about the why behind techniques like these so you can use them when creating your own wreaths, swags, arrangements, bows and door decor.
[Learn More About Kelea’s Design School]
Why This Candy Corn Door Hanger Works
The oversized candy corn gives you an instant focal point and establishes the entire Halloween theme before you add anything.
That means you don’t need to cover the whole door hanger with florals.
Instead, Kelea concentrates the embellishments near the bottom, allowing the shape and lettering of the candy corn to remain visible.
The black, orange and white palette repeats throughout the base, ribbon and picks, tying everything together.
It’s simple—but it doesn’t look plain.
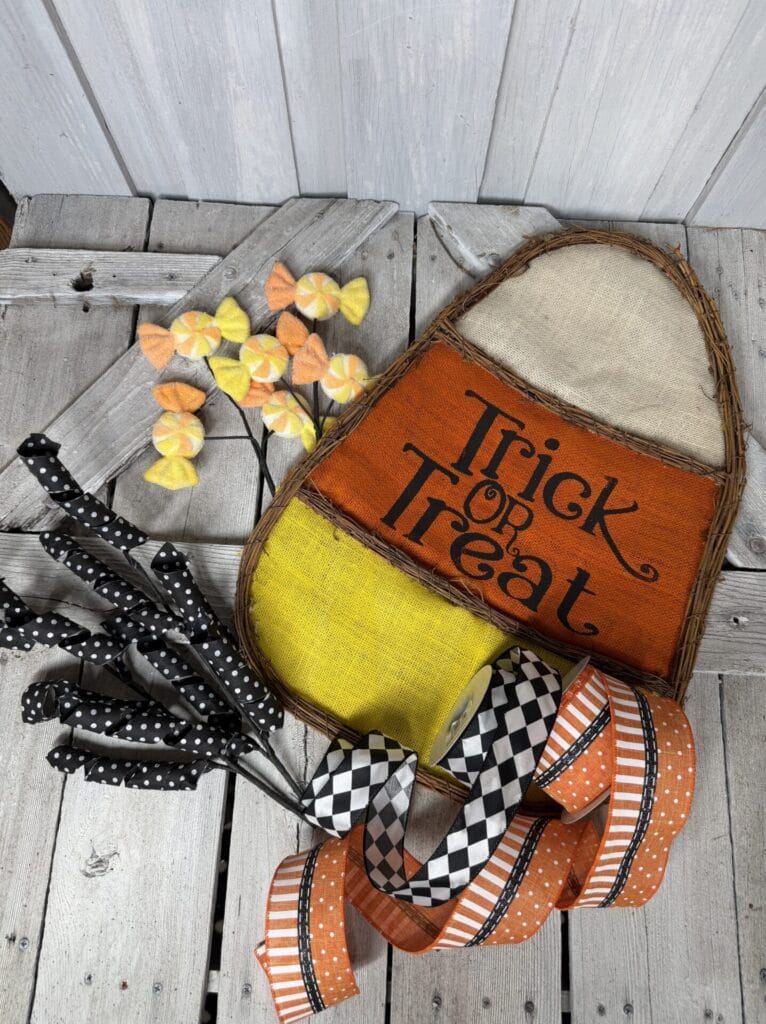
Start with the Candy Corn Door Hanger Base
One of the nice things about this project is that the base already has a hanger attached.
There’s no need to create a complicated hanging system before you begin.
Before attaching anything, though, decide where you want your bow and embellishments to live.
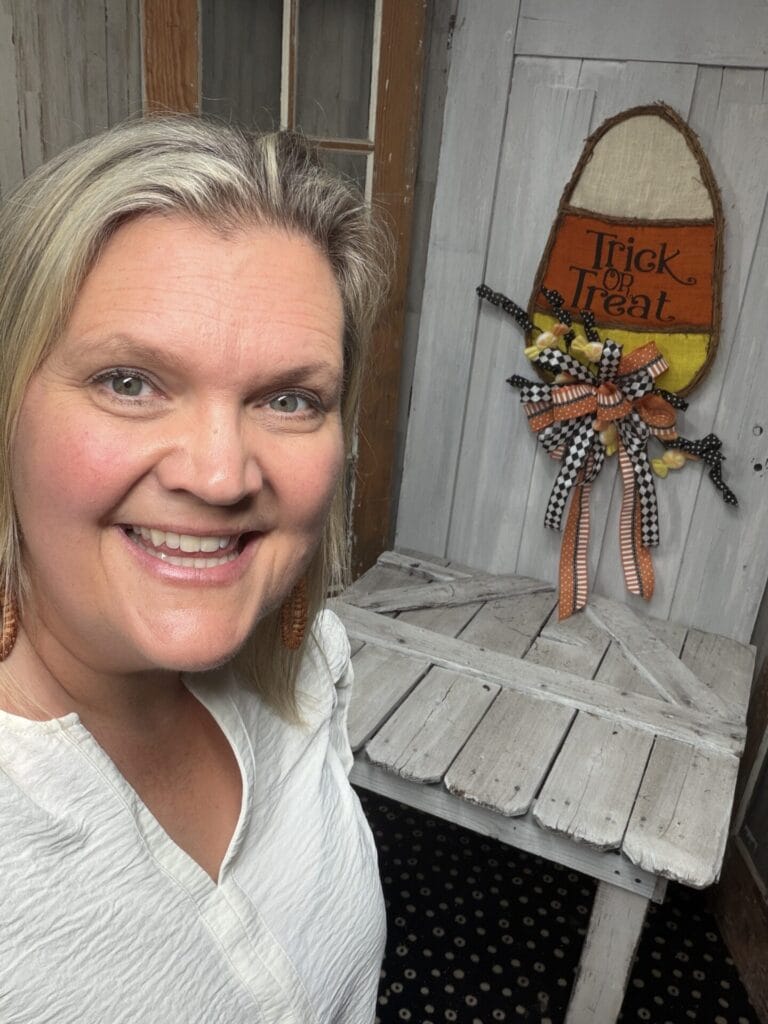
Kelea chooses the bottom of the candy corn and allows the bow tails and picks to flow downward.
You could change that placement, but balance matters.
Think About Weight Before Choosing Your Bow Placement
If you move a large bow and embellishment cluster far to one side, you’re also moving the weight of the finished design.
That can cause your door hanger to tilt.
Kelea points out that you can absolutely put the bow at the top or off to one side, but you may need to adjust the hanger to compensate for the weight.
That’s an important little construction detail that’s easy to overlook.
Make a Layered Halloween Bow
The bow becomes the foundation for the entire embellishment cluster.
Kelea starts with the wider 2.5-inch ribbon toward the back. This gives the narrower ribbon something to layer over and creates a larger foundation.
The narrower Harley Quinn-style ribbon then sits toward the front, where its pattern becomes much more visible.
Build Your Bow from Back to Front
Think about the bow in layers.
Your wider ribbon establishes the overall shape.
Your narrower ribbon introduces another pattern and brings color toward the foreground.
Finally, a small bow-tie-style piece finishes the center.
This back-to-front construction helps create depth before any Halloween picks are added.
Give Your Halloween Bow Plenty of Movement
Don’t stop once the ribbon is tied.
Fluff it.
Separate the loops.
Turn some slightly forward and others outward.
Kelea specifically points out that movement and dimension are what separate an average-looking bow from a really great one.
That’s particularly important with multiple ribbon patterns.
If every loop sits directly on top of the one behind it, you lose the individual ribbons.
Shaping lets each layer have its moment.
“Shake Hands” with Your Halloween Picks
Before building the floral cluster, open and shape your picks.
Kelea calls this “shaking hands.”
Instead of pulling a pick straight from the package and attaching it exactly as it came, spread the pieces apart and give the wired components some movement.
That simple step can make the same material look substantially larger and more dimensional.
Take your time here.
You paid for all those cute details—let them be seen!
Build a Pick Cluster Behind the Bow
Now we get to one of my favorite techniques in this project.
Instead of attaching every whimsical Halloween pick separately to the candy corn, Kelea builds them into one cluster that will sit behind the bow.
The first pieces are crisscrossed from left to right.
Additional candy picks are layered over those pieces.
Then the stems are trimmed to similar lengths.
Layer Some Picks Forward and Others Back
Don’t arrange all your candies on one flat plane.
Move some toward the foreground.
Let others stay behind.
Overlap a few.
That creates the depth and dimension that makes a finished piece look much more substantial.
Kelea explains in the tutorial that adding dimension and depth creates a more valuable-looking finished design—whether you’re selling your work or decorating your own home.
Keep the Construction Neat and Hidden
Once the pick cluster looks right, Kelea secures the pieces together with a cable tie.
The color of that cable tie isn’t particularly important because it’s going behind the bow.
That’s a good example of knowing which mechanics need to be beautiful and which simply need to be strong and hidden.
The cluster is then attached to the strong wire around the door-hanger frame rather than depending on a few small pieces of grapevine to support the weight.
That’s exactly what we want: pretty from the front and dependable behind the scenes.
Create Two Different Lines in Your Candy Corn Door Hanger
Here’s a smart design choice.
Kelea positions the pick cluster primarily left to right.
Then she positions the bow more up and down.
Those two directions intersect.
That gives the finished focal area more visual interest than you’d get if the bow, tails and picks all traveled in exactly the same direction.
Once everything is attached, bend and shape the picks again.
A little adjustment to the right, a little to the left, some forward and some backward—that’s where the finished shape comes together.
Attach the Bow Over the Halloween Pick Cluster
Once the cluster is secured, the bow goes directly over it.
Pull the cable tie tightly enough that the bow nestles into the picks instead of sagging away from the base.
Now the construction disappears.
From the front, you see:
Candy corn → whimsical picks → dimensional bow
rather than cable ties, stems and attachment points.
That’s the goal.
Add Your Own Twist to This Halloween Door Hanger
One of the best points Kelea makes during this tutorial is that you don’t have to make yours exactly like hers.
You can follow the tutorial step by step while you’re learning.
Then, as you become more comfortable, start changing things.
Move the bow.
Change the angle.
Adjust the picks.
Use more or less embellishment.
The tutorial gives you the construction and design principles. Your finished project can still have your personality.
Why Depth and Dimension Matter in Halloween Door Decor
This is a relatively simple project, which makes it a great place to really see the difference depth makes.
Imagine all the picks laid completely flat behind the bow.
You’d still have cute materials.
But you’d lose much of the impact.
Instead, the design uses multiple visual planes:
Candy corn base
↓
Background picks
↓
Foreground candy accents
↓
Layered ribbon bow
Your eye moves from one layer to another.
That’s why a relatively small cluster of materials can create such a strong focal point.
An Easy Halloween Project for a Craft Night
This would also be a fun project to make with a group.
Kelea mentions grabbing a few kits and turning it into a girls’ night or making several as gifts. The construction is straightforward, and beyond the kit, she notes that you mainly need cable ties and wire cutters.
Everyone can start with the same basic project and still change the bow placement or shape the picks a little differently.
You could even make several at once for Halloween gifts.
5 Tips for Making Your Candy Corn Door Hanger Look Professionally Finished
1. Fluff Everything
Open the picks and shape every bow loop.
Don’t let good materials stay compressed.
2. Layer from Back to Front
Wider ribbon goes behind narrower ribbon. Background picks sit behind focal accents.
3. Vary the Depth
Some candy pieces should move forward while others stay farther back.
4. Attach to Something Strong
Secure the focal cluster to the sturdy frame rather than depending on small decorative pieces to carry the weight.
5. Hide the Mechanics
Cable ties and attachment points should do their jobs without becoming part of the finished look.
Frequently Asked Questions About a Candy Corn Door Hanger
Is this candy corn door hanger beginner friendly?
Yes. The project has relatively few construction stages: make the bow, create the pick cluster, attach the cluster and then secure the bow over it.
Does the candy corn base already have a hanger?
Yes. Kelea notes in the tutorial that the candy corn door hanger comes with its own hanger.
Can I put the Halloween bow somewhere else?
Yes. You can move the bow to the top or side, but remember that changing the position of a heavy embellishment cluster may affect how the door hanger balances.
Why should I use different ribbon widths?
The wider ribbon creates the foundation while the narrower patterned ribbon sits toward the foreground. This makes it easier to see both ribbon designs and creates more depth.
What does “shaking hands” with a pick mean?
It’s Kelea’s term for opening, separating and shaping each part of a floral pick before adding it to the design.
Why are the picks attached together first?
Creating one cluster makes it easier to control the overall shape, depth and placement. The bow then covers much of the construction.
Can I make these as Halloween gifts?
Absolutely. This is a quick project that works well for gift-making or a group craft night.
Make Your Own Candy Corn Trick or Treat Door Hanger
This candy corn door hanger proves that an easy Halloween project can still use strong design techniques.
Start with a great focal base.
Build your bow from back to front.
Open and shape your picks.
Create layers instead of keeping everything flat.
Secure your construction.
Then spend those final few minutes fluffing and shaping everything until the finished design has movement.
The result is playful, colorful Halloween front door decor that’s every bit as fun to make as it is to display.
Kit 1614:
[Shop the Candy Corn Trick or Treat Door Hanger Kit]
Keep Learning with Kelea’s Design School
If you enjoy learning why techniques like layering, depth, movement and placement make such a difference, you’ll find much more inside Kelea’s Design School.
Once you understand those principles, you can take them into completely different wreaths, swags, bows, arrangements and seasonal projects.