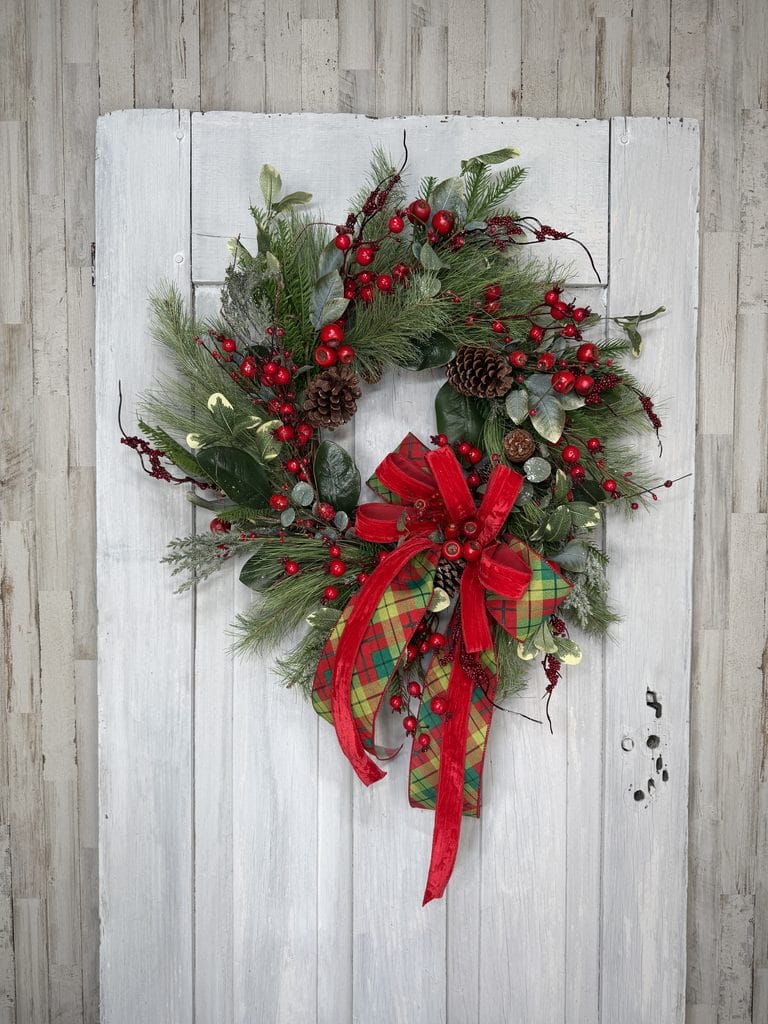
There’s something about a traditional Christmas wreath that never goes out of style. Beautiful plaid ribbon, rich velvet, pinecones, red berries, and wispy evergreen branches create a look that feels both timeless and welcoming.
In this classic Christmas wreath tutorial, Kelea shows how to start with a pre-decorated wreath base and turn it into a fuller, more detailed holiday design. It’s a wonderful project for beginners or anyone who wants to create a designer-style Christmas wreath without spending hours building the foundation.
The finished wreath has that classic Christmas look Kelea loves, with traditional colors, natural textures, and just enough sparkle.
Watch Kelea Make the Classic Christmas Wreath
🎄 Shop the Classic Christmas Wreath Kit
What Makes This Classic Christmas Wreath Special?
Rather than starting with an empty wreath form, Kelea uses a pre-decorated wreath base that already includes pinecones, crab apples, magnolia leaves, and lightly frosted greenery.
This gives you a beautiful foundation before you add anything else.
The additional pine sprays, berries, decorative twigs, and ribbon create the movement and fullness that make the finished wreath stand out.
The best part? The wreath base and coordinating materials are included in Kelea’s kit.
Supplies for Your DIY Christmas Wreath
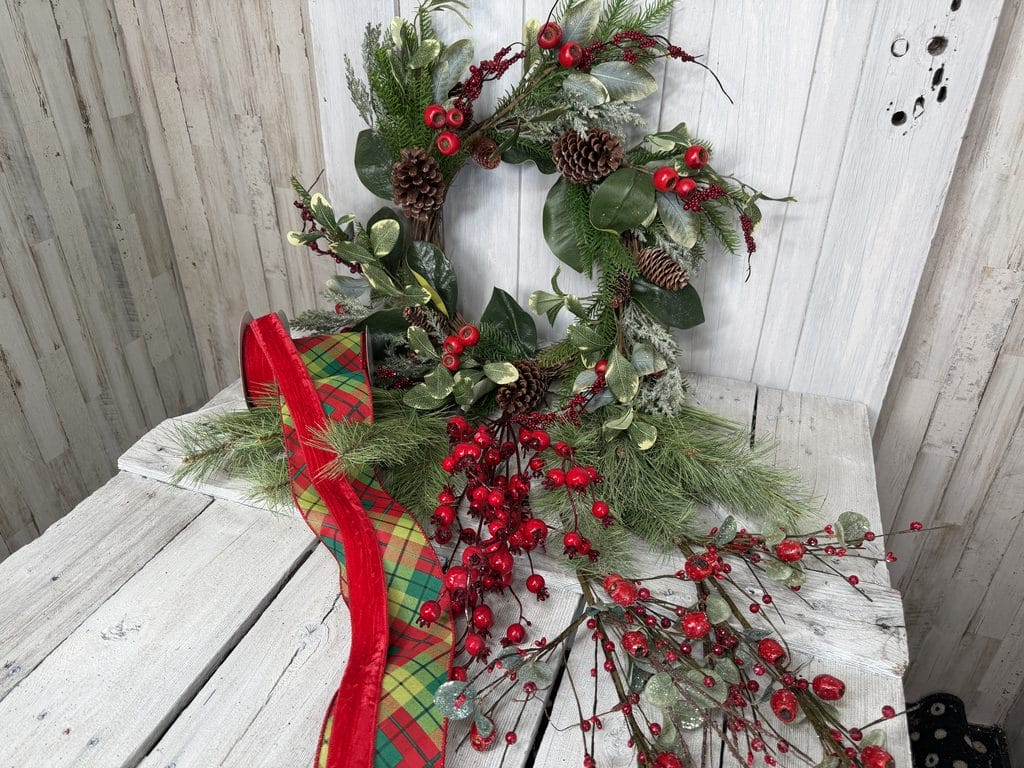
Kelea uses a coordinated selection of traditional Christmas materials:
- Pre-decorated Christmas wreath base with pinecones, crab apples, and greenery
- 4inch Red Green Diagonal Plaid Check Wired Ribbon with subtle sparkle
- 1.5″ Red Velvet Wired Ribbon
- Six Pine with Snow Sprays with bottlebrush-style greenery
- Additional shiny red Crabapple Bush accents
- Two decorative twig sprays with Eucalyptus Berries and sparkle
- Spanish moss to conceal glue and attachment points
- Floral glue, wire cutters, and wire as needed
You can find more details on the Classic Christmas Wreath Kit page.
Step 1: Fluff and Shape Your Christmas Wreath Base
Before adding any new materials, Kelea opens and shapes the existing wreath.
She calls this technique shaking hands with the greenery. Gently separate the sprays, bend the branches, and bring the decorative elements forward.
Pay attention to the variegated greenery, which has touches of white, and the magnolia leaves.
Kelea positions some magnolia leaves toward the outside and others toward the inside to break up the textures.
Find the natural spaces
The wreath already has decorative clusters positioned around its base.
Between these clusters are natural openings where you can add more greenery.
Keep these spaces visible while you’re working so you know exactly where to insert your new stems.
Kelea’s design tip: Don’t rush to fill every opening. First, understand the existing shape and how the materials naturally flow around the wreath.
Step 2: Add Long-Needle Pine for Wispy Movement
The first additional material Kelea uses is long-needle pine.
These sprays combine bottlebrush-shaped greenery with longer pine needles, giving the wreath a beautiful mixture of textures.
Prepare your pine sprays
Open and separate the greenery, then trim the stems to approximately one inch.
Kelea inserts the pine sprays into the openings between the existing decorative clusters.
She works clockwise around the wreath, keeping all the greenery moving in the same direction.
Establish the wreath’s perimeter
The long pine needles extend beyond the existing greenery, making the wreath appear larger and fuller.
Kelea also brings some pieces toward the inside of the wreath to add depth.
When attaching the stems, she uses glue and Spanish moss to keep the construction neat.
Designer tip: Be careful when handling freshly glued long-needle pine. Kelea warns that the glued stems can become very hot.
Step 3: Choose the Perfect Spot for Your Bow
Once the pine is in place, Kelea steps back and studies the wreath.
Rather than deciding where the bow should go before she starts, she looks for an area that needs a little more fullness.
That becomes her bow zone.
This is a smart way to work with a pre-decorated wreath because the existing materials already establish much of the design.
Let the wreath guide your placement
If one section appears slightly less full than the others, a large bow can provide the perfect balance.
Kelea leaves this area open while continuing to add the remaining greenery and berries.
Design lesson: A bow should look like it belongs within the arrangement, not like it was simply attached to the front at the end.
Step 4: Layer Red Crab Apples Over the Pine
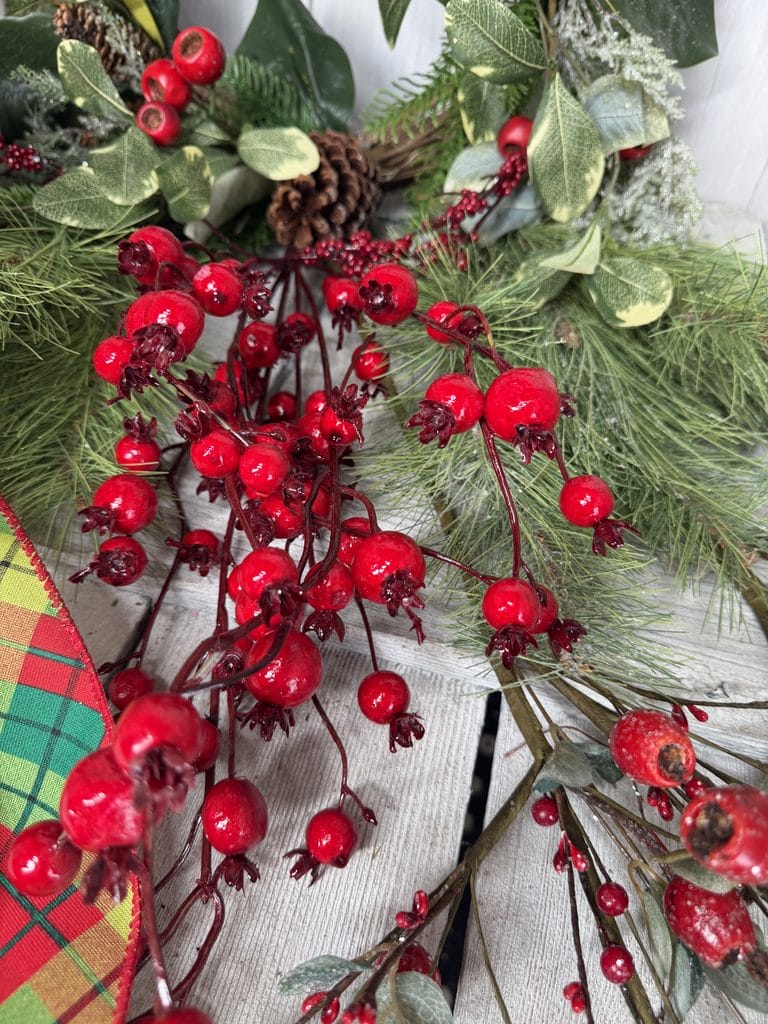
Next, Kelea adds shiny red crab apple stems.
The wreath base already contains some crab apples, but these additional pieces have a slightly different finish.
The contrast creates more visual interest while repeating the traditional Christmas red throughout the wreath.
Keep the stems long
Kelea keeps the crab apple stems relatively long so they can extend beyond the pine.
She places them over the greenery added in Step 2, following the same clockwise direction.
The berries should sit in front of the greenery rather than disappear behind it.
Save a few pieces for the bow
Kelea sets aside some of the longer crab apple stems.
These will become important finishing accents when she decorates around the bow.
Kelea’s design tip: Repeating the same color in different textures helps create a coordinated design without making every section look identical.
Step 5: Add the Plaid and Velvet Christmas Bow
The bow brings the entire traditional Christmas color palette together.
Kelea pairs a beautiful 4-inch diagonal plaid ribbon with a 1.5-inch textured velvet ribbon.
The combination adds pattern, richness, and just a little sparkle.
Tuck the bow into the wreath
Rather than positioning the bow flat against the front, Kelea nestles it into the opening she reserved earlier.
She adjusts the surrounding greenery and pinecones so the bow becomes part of the wreath’s structure.
The wired ribbon allows her to shape the loops and tails around the nearby decorative elements.
Design lesson: A bow looks more integrated when greenery and other accents surround it instead of leaving it isolated on the surface.
Step 6: Add Decorative Twigs and Frosted Berries
Now it’s time for the finishing layers that give this wreath its personality.
Kelea uses decorative twig sprays containing crab apples, berries, eucalyptus, and a light touch of sparkle.
She cuts the sprays into smaller sections, keeping enough stem length for the twigs to extend beyond the greenery.
Fill the areas that need more drama
Kelea studies the wreath and identifies where the existing twig accents are already concentrated.
Instead of automatically placing the new twigs opposite one another, she puts the most dramatic pieces where they will make the greatest visual difference.
She continues around the wreath, layering the remaining sections between the existing greenery clusters.
Kelea’s design tip: You don’t always have to follow perfect symmetry. Pay attention to the overall balance and place your most noticeable materials where they’re needed.
Step 7: Create a Beautiful Transition Around the Bow
One of the most useful techniques in this tutorial happens near the end.
Kelea adjusts an existing pinecone so it can extend from the center of the bow at a more attractive angle.
Turn a pinecone into a decorative pick
She removes the pinecone from its original position and adds a longer piece of wire.
Kelea explains that 18-gauge wire works well for this technique.
The longer wire allows her to reposition the pinecone securely.
She then adds saved crab apple stems behind the ribbon tails, helping support the bow and carry the red accents into the surrounding greenery.
Finish with eucalyptus and berries
Small pieces of eucalyptus are tucked above and below the bow.
Kelea also adds a few remaining berries to create a smooth transition through the center of the ribbon.
These final details connect the bow to the rest of the wreath while maintaining its clockwise movement.
Step 8: Check the Finished Christmas Wreath
Before calling the wreath finished, Kelea checks the placement of the greenery, berries, twigs, and ribbon.
She adjusts anything that looks too crowded or hidden.
Any exposed glue can be covered with Spanish moss for a cleaner finish.
The finished design combines traditional plaid, velvet, red berries, frosted pinecones, and beautiful wispy greenery.
It’s classic Christmas decorating with a designer’s attention to detail.
What You’ll Learn from This Christmas Wreath Tutorial
This project teaches several techniques you can use in future wreath designs:
- How to work with a pre-decorated wreath base
- How to establish the perimeter using long-needle pine
- How to maintain a consistent direction around the wreath
- How to layer red berries over greenery
- How to identify the best location for a large bow
- How to create decorative picks using wire
- How to finish a wreath with professional-looking details

Frequently Asked Questions
Is this classic Christmas wreath beginner-friendly?
Yes! Kelea recommends this project for beginners because the pre-decorated wreath base gives you a head start.
What ribbon does Kelea use?
She combines 4-inch plaid wired ribbon with 1.5-inch textured velvet wired ribbon for a traditional Christmas look.
Why does Kelea add long-needle pine?
The pine extends the wreath’s perimeter and creates wispy movement, making the design appear fuller.
How do I decide where to place the bow?
Kelea recommends looking for an area that needs more fullness after establishing the greenery. That opening becomes the bow zone.
How do I hide glue on a Christmas wreath?
Kelea uses Spanish moss to cover exposed glue and attachment points.
Can I use this wreath-making technique with other designs?
Absolutely! The same principles of shaping the base, layering greenery, following a consistent direction, and adding focal accents can be applied to many seasonal wreaths.
Make Your Own Classic Christmas Wreath
If you love traditional Christmas decorating, this wreath is a beautiful project to try.
The combination of plaid ribbon, velvet, frosted pinecones, red crab apples, and natural greenery creates a timeless holiday design.
And because you’re starting with a pre-decorated wreath base, you can spend more time on the creative details that make your wreath special.
🎄 Shop the Classic Christmas Wreath Kit
Want to learn more floral design techniques? Visit Kelea’s Design School for more wreath-making inspiration and instruction.
Don’t just decorate, design!