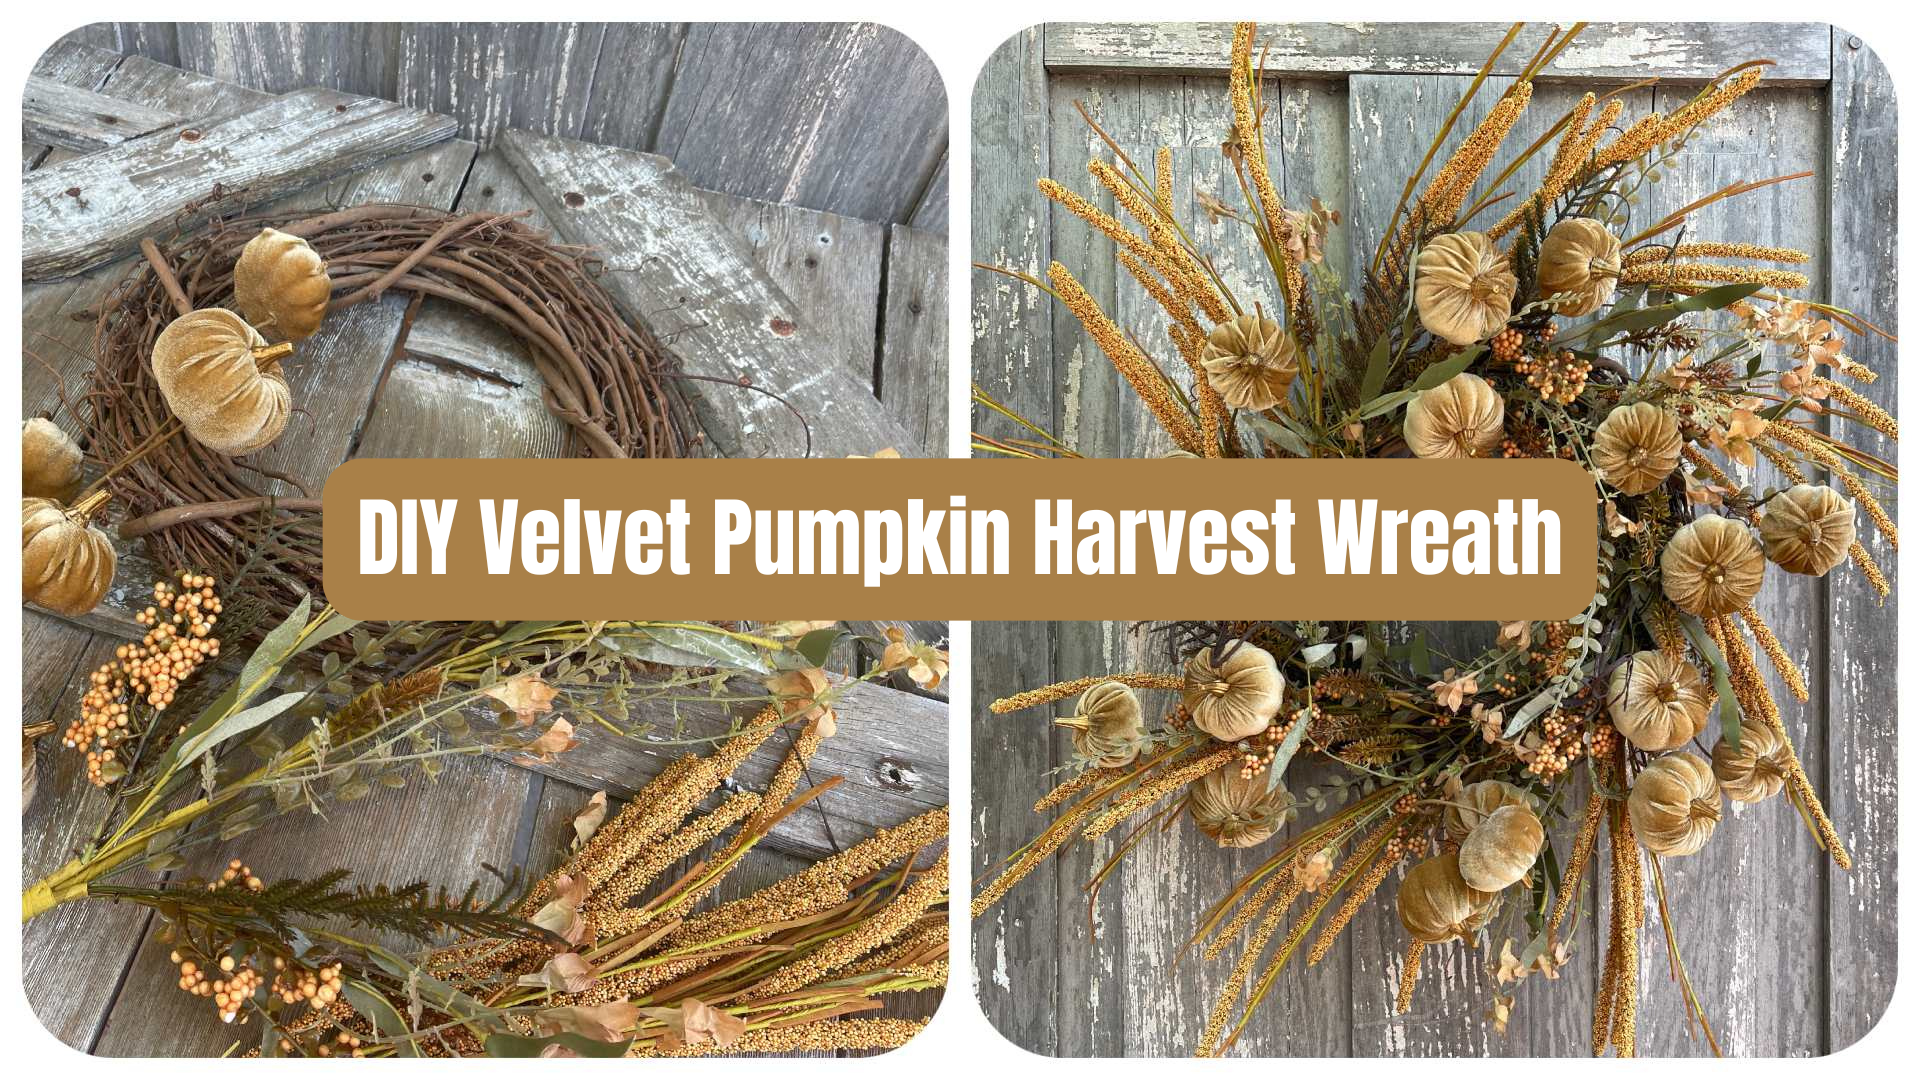
A velvet pumpkin fall wreath is a beautiful way to bring warm harvest color to your front door without relying on the usual bright orange fall palette.
This design combines soft brown velvet pumpkins with golden seteria, berries and layered greenery for a wreath that feels natural, textured and full of movement. Even better, the construction is surprisingly simple.
In the video tutorial, Kelea builds this wreath using just a few coordinated floral elements while teaching placement techniques you can use again in future wreaths.
Ready to make this project?
[Shop the Velvet Pumpkin Harvest Wreath Kit Supply List]
Watch the complete tutorial:
[Watch Easily Make a Velvet Pumpkin Harvest Wreath with this Kit on YouTube]
Learn More Than Just One Wreath
One of the best things about following a complete floral tutorial is learning techniques you can carry into your next project.
Kelea’s Design School goes deeper into floral design principles including placement, direction, movement, depth, dimension and construction so you can understand why a design works instead of simply copying where each stem goes.
[Learn More About Kelea’s Design School]
Why This Velvet Pumpkin Fall Wreath Works
The finished wreath uses a warm, tonal color palette rather than a large number of contrasting colors.
Golden brown, tan, muted greenery and soft velvet pumpkins work together while the different textures provide the visual interest.
The elongated seteria sprays create the wispy outer shape. Berry-and-greenery sprays begin filling the middle. Finally, the velvet pumpkins become the repeating focal element throughout the wreath.
Because the materials have very different shapes and textures, the design has plenty to look at without feeling overly busy.
Start Your DIY Fall Wreath with the Perimeter
Kelea begins this project on a 14-inch grapevine wreath base.
Rather than immediately filling the center of the wreath, she first establishes the outer layer, or perimeter.
This is an important floral design technique because the perimeter helps determine the overall size, shape and movement of the finished wreath.
Use 12, 3, 6 and 9 O’Clock Placement
If you’re unsure where to begin placing your first stems, imagine the wreath as the face of a clock.
Start around:
- 12 o’clock
- 3 o’clock
- 6 o’clock
- 9 o’clock
Then begin filling the spaces between those first placements.
This breaks a round wreath into manageable sections instead of making you guess where every stem should go.
Kelea uses this technique to distribute the first seteria pieces before filling between them.
Choose Wispy Materials for the Outer Layer
The outermost materials should help establish the shape of your wreath.
For this project, the seteria has long stems with plenty of movement. Instead of creating a hard circular edge, the pieces reach naturally beyond the grapevine base.
That creates the wispy, free-flowing silhouette you see in the finished wreath.
Don’t leave all those wired stems perfectly straight. Bend and shape them slightly so they look like they naturally grew in that direction.
Add the Filler Layer for Depth and Texture
Once the outside shape is established, Kelea moves to the filler bushes.
These combine greenery, berries, brown fern-like texture and twig elements, giving the wreath several things at once:
- More fullness
- Additional color
- Texture
- Depth
- A transition between the outer foliage and velvet pumpkins
Before putting them into the wreath, take time to separate and shape the individual pieces.
A wired floral spray usually looks completely different once its leaves, berries and branches have been opened and positioned.
Use Triangle Placement in Your Fall Wreath
Triangle placement is one of the key design techniques used in this project.
Rather than putting three distinctive twig pieces next to one another, Kelea positions them so they create an imaginary triangle around the wreath.
Why?
Because your eye sees balance without seeing a rigid pattern.
The pieces feel evenly distributed, but the wreath doesn’t look like everything has been measured and placed exactly the same distance apart.
After those first three points are established, the remaining filler pieces can go between them.
This is an easy technique to remember when you’re designing wreaths with several repeated stems.
Add Velvet Pumpkins to Your Fall Wreath
Now for the part that gives this wreath its personality: the velvet pumpkins.
Instead of creating one giant pumpkin cluster, the pumpkins travel around the entire wreath.
That repetition helps your eye move around the design.
Alternate Long and Short Pumpkin Placement
One detail that keeps the pumpkins from looking like they’re sitting in a perfect ring is alternating their placement.
Some sit farther out.
Others sit closer to the wreath base.
Kelea alternates longer and shorter stems and continues using triangular groupings so the pumpkins appear naturally scattered through the arrangement.
If one pumpkin reaches farther outside the wreath than you’d like, you don’t necessarily have to remove it and start over.
Because the stems are wired, gently curl or bend the wire to bring the pumpkin closer to the wreath.
Small adjustments like this make a big difference in the final silhouette.
Shape Your Wreath After the Pieces Are Added
Don’t expect every stem to land perfectly the first time.
Once several pumpkins and filler pieces are installed, step back and look at the wreath again.
Ask yourself:
- Is one pumpkin sticking out too far?
- Is one section visually heavier than another?
- Are the berries visible?
- Does the wreath still have a nice open center?
- Are there empty spots that draw your eye?
- Does the outer greenery still have natural movement?
Because many of the materials are wired, you can continue shaping the wreath even after they’ve been secured.
That final shaping is part of the design process.
Hide the Mechanics for a Finished Look
Glue has an important job.
It does not need to be part of the finished look.
Kelea uses Spanish moss throughout this project to help camouflage glue and mechanics around the grapevine base.
Near the end, she also creates small filler clusters from leftover materials and tucks them into areas that need a little more coverage.
That’s a useful habit for almost any wreath project: save some small filler pieces until the end.
They can solve the tiny holes you don’t notice until the larger pieces are already in place.
And if you’ve used every piece? Look for a small bit of greenery tucked somewhere it isn’t visible and redistribute it where it can do more work.
A Simple Wreath Recipe with Big Impact
One of the best lessons from this project is that a beautiful wreath doesn’t necessarily require a huge number of different materials.
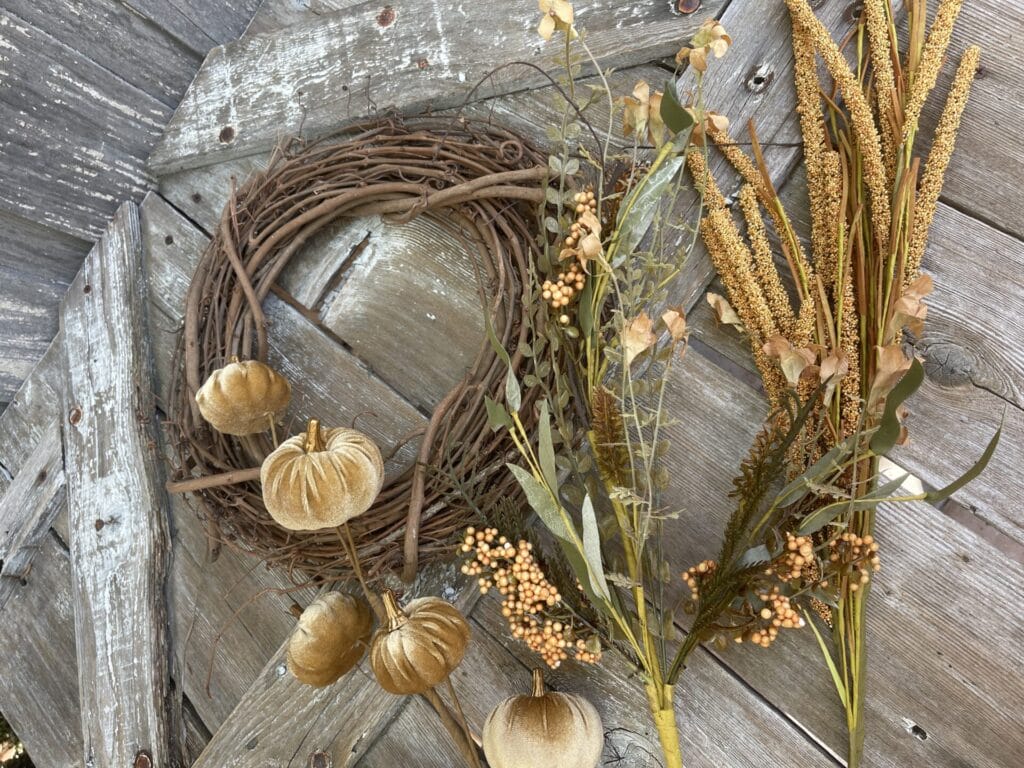
The kit itself is built around three main floral components:
- Yellow seteria sprays
- Brown velvet pumpkin sprays
- Beige lavender berry sprays
The product supply list includes three of each, creating a very manageable recipe for a wreath with substantial texture and dimension.
The 14-inch grapevine base, Spanish moss, glue and basic tools provide the mechanics.
This is a great example of allowing placement and texture to do more of the design work.
Use Your Velvet Pumpkin Wreath as a Centerpiece Too
Here’s one of my favorite things about this design: it doesn’t have to stay on a door.
The wreath can also lie flat on a dining table, coffee table or kitchen island.
Place a large battery-operated candle, decorative bowl or another fall accent in the center and the wreath becomes a harvest centerpiece.
That gives you two completely different ways to decorate with the same project.
It can greet guests at the front door one week and become part of your Thanksgiving table the next.
Where to Display Your Velvet Pumpkin Fall Wreath
This warm neutral palette works in plenty of spaces around your home.
Try it on:
- A front door
- An interior door
- A covered porch
- A kitchen wall
- Above a fireplace
- A dining room wall
- A buffet or sideboard
- A tabletop surrounding a candle or bowl
Because the colors are more harvest-inspired than holiday-specific, you can use this design throughout much of the fall season.
Tips for Making Your Fall Wreath Look More Natural
Let Some Pieces Reach Beyond the Wreath
Not everything needs to stay inside a perfect circle.
Those wispy outer stems create energy and movement.
Vary Your Depth
Some pumpkins should sit forward while others nestle deeper into the greenery.
The same applies to berries and leaves.
Repeat Without Making It Match
Repeating pumpkins and similar foliage creates cohesion.
Placing everything at exactly the same depth and spacing creates stiffness.
Use consistent materials with varied placement.
Shape Wired Materials
If a stem is wired, use that feature.
Curve foliage, change the direction of a pumpkin or gently bend a long stem until the movement feels right.
Save Filler for Last
A few small pieces at the end can cover mechanics and balance a section without adding another entire bush.
Frequently Asked Questions About This Velvet Pumpkin Fall Wreath
Is this velvet pumpkin fall wreath beginner friendly?
Yes. The design uses a straightforward layering process: establish the perimeter, add filler, position the pumpkins and then make final adjustments. Using the clock-position method also makes the first placements easier to visualize.
What size wreath base is used?
Kelea uses a 14-inch grapevine wreath base for this project.
How do I keep the wreath from looking too symmetrical?
Use triangle placement, vary your stem lengths and adjust the depth of repeated pieces. The materials can be balanced without being identical on every side.
Can I change the shape after I glue everything in?
Many of the stems are wired, so you can still make small adjustments after they’re installed. Bend or curl stems to bring pieces inward or create more movement.
How do I hide visible glue?
Spanish moss works well for camouflaging glue and other construction mechanics around a grapevine base. Small leftover greenery pieces can also help cover problem areas.
Can I use this wreath as a fall centerpiece?
Yes. Lay the wreath flat and place a large battery-operated candle, bowl or decorative accent in the center for a completely different display.
How long can I use this wreath for fall decorating?
The brown, tan and harvest-gold palette isn’t tied to one specific holiday, making it a versatile choice for autumn decorating and Thanksgiving.
Make Your Own Velvet Pumpkin Harvest Wreath
The Velvet Pumpkin Harvest Wreath proves that you don’t need dozens of different floral elements to create a design with plenty of impact.
Start with a strong perimeter.
Layer in texture.
Use thoughtful placement instead of simply filling holes.
Give wired pieces movement.
And let the velvet pumpkins become the repeating element that ties everything together.
The result is a velvet pumpkin fall wreath that feels warm, organic and wonderfully different from the traditional orange fall wreath.
Kit 1603:
[Shop the Velvet Pumpkin Harvest Wreath Kit Supply List]
Full Video Tutorial:
[Watch the Velvet Pumpkin Harvest Wreath Tutorial on YouTube]
Keep Learning with Kelea’s Design School
If you enjoy learning techniques such as setting the perimeter, triangle placement, working with depth and dimension, creating movement and finishing your mechanics, there’s much more to explore inside Kelea’s Design School.
The goal isn’t simply to recreate one wreath. It’s learning design principles you can use when you’re standing in front of an entirely different collection of florals and deciding what to make next.