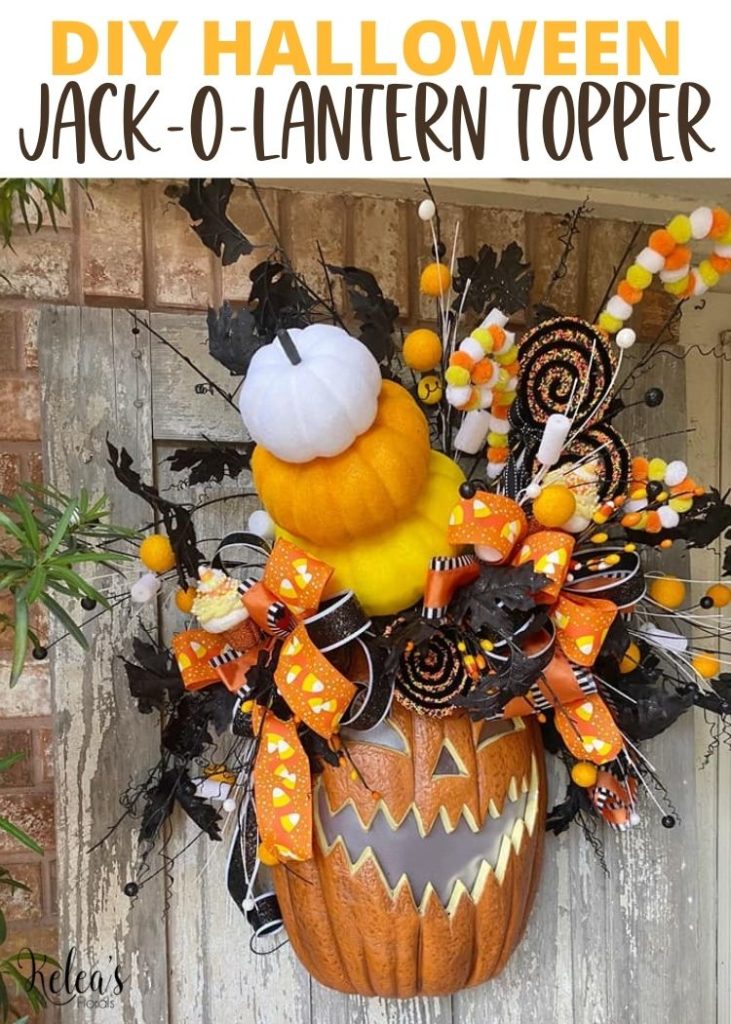
Follow along in this video tutorial as I show you how I turned a Jack-O-Lantern from the At Home store into an amazing piece of Halloween decor.
I am not a fan of creepy Halloween. No sir, not me! Not at my house. But I found this awesome Jack-O-Lantern, equipped with a giant smile and animated sounds. I knew could become fun and whimsical with just a little bit of love.
Get ready to have some fun with florals, which you know is my favorite thing to do. I also love to add some embellishments to help transform this once creepy pumpkin into a new favorite Halloween decor. Are you ready to learn how with me? Let’s get started!
DIY Halloween Decor
I love fun projects, and this one is F-U-N! I found this Jack-O-Lantern at the At Home Store and just knew he could be something way cuter. That got me pondering about what could I use to transform him into a cute Halloween decoration for my front porch. The ideas just kept coming.
Let me show you just how to transform a large jack-o-lantern into something even more perfect for this Halloween. I will show you how to take him to the next level of F-U-N. Simply by adding some fabulousness in the form of lollipops, curly-qs, beautiful bows, and more.
Do not stress if you can’t find this exact pumpkin, or even one this large in size. My steps are easy to apply to any size pumpkin you find or have room for in your home. Follow along as I show some simple techniques for working with a foam base.

Throughout this project, I will teach you how to set a perimeter of your designs and many other great techniques, as I do for members who are part of my Design School. We will discuss why we “Break the plain,” or “Frame out” your project. These terms are not meant to scare you, even with a creepy pumpkin as your base, but to get you feeling comfortable in the crafting world! Let me teach you step-by-step how to do just that.
Be sure to check out my design school if you are interested in learning more about creating your own designs. I want you to be sure you are on the waitlist. That way you know when it opens up again. So head over there and join the waitlist today!
This is a simple project and you can have a one-of-a-kind Halloween decor in little to no time. Just like the Easy Candy Corn Wreath I have taught!
Be sure to grab your supplies and follow along with me in the tutorial video! Just remember to have some fun and check back soon for new videos and instructions.
Ingredients
Directions
- With your large jack-o-lantern pumpkin, purchased at Home Goods or wherever you are lucky enough to snag one, give a good cleaning to the plastic with a baby wipe.
- Once dry, add some floral foam right up on top, using a liberal amount of hot glue or gorilla glue. This is why we cleaned the top of the pumpkin.
- Grab your black oak leaves spray and push up your leaves. Prep to look like a full head of hair for our fun, not-so-little pumpkin. We are adding these branches to frame out our work for this project.
- Trim the stems with wire cutters, dip them into your hot glue pot, and insert them into your foam blocks out and around. Shaping out your base as you go. I used 5 of these branches.
- You could make this guy even scarier by adding a skeleton right on top instead… but you remember, I don’t do scary at my house. So I am sticking with these fun, whimsical pumpkins.
- Grab your pumpkin stack, and insert your dowel rod dipped in hot glue at a cockeyed angle right into your foam. He kind of looks like a drunk pumpkin, and I love it!
- To keep him with a cute, whimsical vibe, grab your marshmallow stem, and let’s add to soften the black and build the shape of our project. Trim sections from your main bundle and insert throughout your foam with hot glue, poking out here and there.
- Next, let’s add our lollipops to help balance out the height of our pumpkin stack. Trim a bit to be the height you want. Don’t forget to dip your stem into hot glue before entering your foam block base.
- I created a larger bow with a long tail on the right and a smaller bow with a long tail on the left to flank the whole design. Ribbons used for both bows are candy corn, black with glitter, and orange with black and white checks. Add your larger bow to the left of the front of your pumpkin stack and then your 2nd bow a bit higher up by your lollipops. Be sure to add a bit of glue before you add your bows to help secure your foam.
- Curl and roll your ribbon tails to enhance the cute factor and frame the face. To break the plain of the ribbon in front, grab more of your back leafy branches and trim. Tuck them in and out of your bows we just added. They will look like bangs on your cute, creepy jack-o-lantern.
- Next, we will add your orange, yellow, and white wired curly-qs and play with them to create the look you want. Once you like their look, dip in hot glue, and work into your foam up behind your candy lollipops adding a bit of height. Stage them around so they accent well.
- Add a second, shorter curly-q off to the opposite side, popping out from your pumpkin stack. Grab your orange and white glittery cupcake accents. Trim from the main bundle to pop in right by your bows on both sides.
- For our finishing touches let’s grab, your short candy corn picks and give a good trim. Using these to fill in any height, even if it is a shorter height, add them popping out where you see fit.
Want to learn more?
Join the free Facebook group Keleas Bloomarino Buds Wreath Making Community


