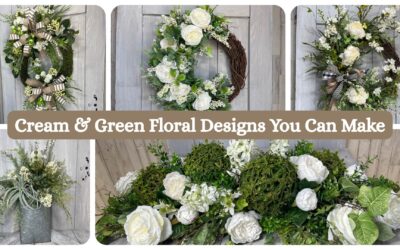
Learn how to make your own DIY garden wedding centerpieces for that next big event you have coming up by following along step by step in this video tutorial. Check out these great ideas today!
DIY Garden Wedding Centerpieces
Looking for some DIY centerpiece ideas then you are in the right place! I am loving how simple and easy these garden wedding centerpieces were to make in less than 20 minutes. With very few supplies, battery-operated candles, some greenery, and a few floral fillers you can make your own too! Follow along as I show you step by step how to make your own DIY centerpieces for any occasion. Trust me it is super simple and I am excited to show you exactly how to do them.
I am super excited to show you some adorable centerpieces you can make for events. I am sure you guys are always wondering how to spruce up a table for a party or even a wedding. These DIY Garden Wedding centerpieces I am sharing with you today can be modified to fit whatever event you are decorating for. This could even include seasonal parties. You could completely change these to make cute Halloween or even Christmas centerpieces. I am sure your mind is running with all the ideas right now! I know mine is.
Most importantly when designing your centerpieces for a table make sure you are always using a battery-operated candle. I mean do I really have to explain why but just in case it is to keep you from starting a fire when using artificial or live florals in your design! Let’s not make the party too memorable!!
Another great tip is to always keep your designs low. You do not want your guest to not be able to see the people across the table from them. It also helps in keeping the centerpiece from tipping over or being knocked over. Using floral foam blocks inside your containers helps you keep things balanced as well as beautiful. Those foam blocks help you place your florals in your centerpiece and make a high statement with little work.
I am loving these DIY centerpieces and hope you are too. Get creative and make your own centerpieces today for that next big event you have coming up. Really wow your guest with some amazing DIY centerpieces at your next event!

Ingredients
Directions For Large centerpiece
- If your container has a seam make sure this is the back of your centerpieces. Using green floral foam cut a piece where it will fit into the bottom of your container. Using gorilla glue and hot glue place it on the bottom of your foam block and then press down onto your tin can. Make two blocks and glue them on top of each other to give some height
- Take your large candle and sit it on top of your foam blocks. Using floral pins secure your candle in place. Do not push these into your candle just push them down into the foam block to help keep it snug. Add some hot glue to the floral pins for extra protection. This is just giving your candle a zone to sit in.
- Using a rosemary bush cut some stem off your bush and get one stem into two. Start adding these closer all around your candle. Pushing the stem directly into the foam block. To make it more full go around and do a bottom layer of moss around the row you just placed.
- With moss ribbon run it around the top of your candle to measure the amount you need. Then trim it where it just slightly overlaps. Tack it with a little bit of glue to hold that moss ribbon in place.
- Now with an artificial grapevine that comes in a roll, take a couple of pieces off by gently pulling it and gather a few strands from it. Run it right on top of your moss ribbon and tie a little knot.
- Cut a little succulent off and tie it on with your grapevine knot is. Placing it at an angle and tuck it in. You can curl the ends of the grapevine too using your finger.
Directions for small centerpiece
- Using green floral foam cut a piece where it will fit into the bottom of your container. Using gorilla glue and hot glue place it on the bottom of your foam block and then press down onto your tin can. Make two blocks and glue them on top of each other to give some height. Be sure to add lots of hot glue to make sure they stay. In this one you are adding an additional foam block so you will have three.
- Take your candle and sit it on top of your foam blocks. Using floral pins secure your candle in place. Add some hot glue to the floral pins for extra protection. This is just giving your candle a zone to sit in.
- Using a daisy stem cut some stems off into smaller pieces. Then cut up your button grass greenery as well into smaller pieces. Start adding these by alternating the daisies and grass around your candle. Just create your own pattern and work your way around it. I am leaving a hole to come back and add some succelents.
- Now with an artificial grapevine that comes in a roll, take a couple of pieces off and make a cute little loop and pin it on one side of your tin container.
- Make it appear like it has a handle using that grapevine.

Are you searching for a unique DIY project this Halloween? Look no further than the Frankie Centerpiece Kit, perfect for adding a personalized and cute spooky touch to your Halloween decor. This DIY arrangement kit blends creativity with simplicity, making it an ideal craft for all skill levels.
DIY Frankie Centerpiece for Halloween Home Decor
Crafting your centerpiece is straightforward and enjoyable. You’ll need some basic tools like styrofoam, wire cutters, scissors, and hot glue. Begin by setting styrofoam inside the bucket, strategically place the twig sprays and, and use the eyeball picks for a finishing touch of flair.

Let me show you how to create your own DIY Frankenstein Halloween Centerpiece that is a cute not spooky decoration for Halloween. Mixing your spooky decorations with old and new gives you fun times spent crafting together now while reminiscing about the Halloweve of yester years. It’s a wonderful way to start a family tradition or simply enjoy some seasonal crafting magic.
Ingredients
Directions
- Start by finding cutting the styrofoam so it is nestled inside of the Green Frankenstein Bucket so that it sits nicely inside and glue down. I like to use both Gorilla Glue and Hot Glue to really secure it for both now and long term.
- Cut Black Garland Base into small sections and set your base, spreading for maximum coverage.
- Prep your picks by grabbing your Purple Green Orange Felt Ball Twig Sprays. Sseparating them into smaller picks. You can also twist the black chenille around your finger to create a fun effect.
- Trim your Glitter Eye Ball Picks and add to the stryofoam. Be sure to space them for the best visual display.
- Cut and prep the White Black Chenille Curly Stems add some dimension to them by curling with your fingers to really give them life.
- Stem back and look at your your centerpiece. Are thier bald or blank spaces? Fluff you black garland to fill and use the wires in your products from Keleas.com to really get the pieces where you want them.
- Grab one of your Glitter Curly Velvet Ball Picks and trim the stem down to a couple of inches. Fluff out your pick, and then place it to the left of your bow, tucking it behind the bow to have it peek out from behind it.


