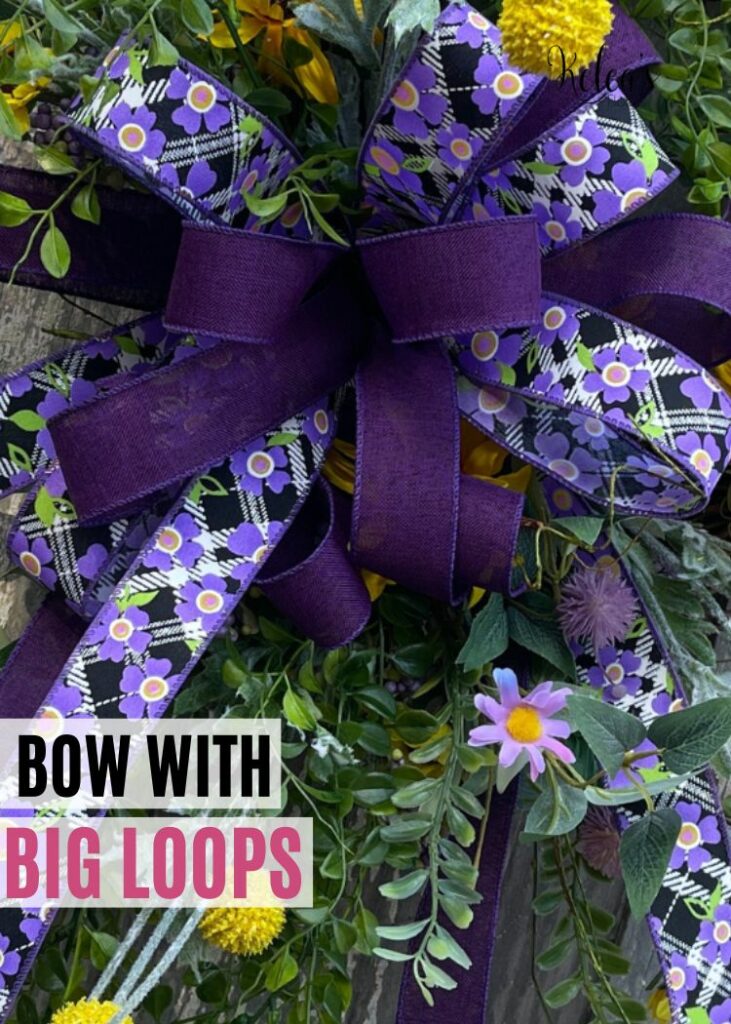
Make a statement with Bow with Big Loops! Perfect for wreaths, centerpieces, and more. Elevate your projects with this fun and versatile bow.
Create a Bow with Big Loops
Get ready to add a touch of whimsy and elegance to your projects with our Bow with Big Loops tutorial! This charming bow, featuring oversized loops, is a delightful addition to wreaths, centerpieces, and various other arrangements. With its playful yet sophisticated look, it’s sure to become a favorite embellishment for your crafting endeavors.
Crafting your own Bow with Big Loops is easier than you think! Whether you’re a seasoned crafter or new to DIY, this tutorial will guide you through each step with clear instructions and helpful tips. With just a few simple supplies and a bit of creativity, you’ll be tying beautiful bows that make a big impact in no time.
Ready to unleash your creativity? We’ve got all the tips and tricks you need to make your Bow with Big Loops stand out. From selecting the perfect ribbon to mastering the art of looping, we’ll cover everything you need to know to create bows that wow. Let’s get started and elevate your projects with this fun and versatile bow!
 Print
Print
Ingredients
Directions
- Grab your 1.5″ Purple Wired Ribbon, cut an angle cut, then start by measuring your tail. I went with nice long tails, about 20”. Place it between the rods on your bow maker. Add a twist to your ribbon, right hand forward, left hand back, so the back of your ribbon is facing up.
- Create your first loop by looping your ribbon, then placing it back into your center rods. I went with 6” loops. Scrunch it down and twist.
- Create 3 more loops by following the same steps as your first loop, for a total of 4 loops, two on each side of the center pegs.
- Measure and cut your second tail with an angle cut to match your first.
- Now, we’ll add a second layer to your bow. Add your 1.5″ Black and White Diagonal Plaid with Purple Flower Ribbon to your bow maker. Measure your first tail. I went a little bit shorter, about a 16” tail. You can adjust these measurements to make your bow look as you’d like.
- Create 6 loops the same way as before, 3 on each side of the bow, with the same large 6” loops.
- Measure and cut your second tail to match your first.
- Add your 1.5″ Purple Wired Ribbon back onto the bow maker. Measure your first tail. I went a little bit shorter again, about a 12” tail.
- Create 2 loops with this ribbon, the same way as before, 1 on each side of the bow, with a little bit shorter loops at 5” loops.
- Measure and cut your second tail to match your first.
- Thread your cable tie behind your ribbon, then carefully remove the ribbon from the bow maker.
- Fluff and arrange your loops and tails. Tighten your cable tie, rotate it to the back of the bow, then tighten all the way.
- Your bow is ready to go on your wreath!
TIPS AND TRICKS
- We definitely recommend using a bow maker tool to create a perfectly shaped bow.
- Experiment with different bow sizes by adjusting the length of the ribbon tails and loops.
- Embellish your bow with decorative picks, faux flowers, or greenery to customize it for different occasions.
- I used a wide ribbon for this bow, a 1.5”wire-edged ribbon, and I think that wire-edged works best. But you are free to use this same bow with any type of ribbon you’d like to match your wreath. Your bow will be more floppy if you use a ribbon that is not wire-edged.
Where can I find wide and sturdy ribbon for creating this type of bow?
For wide and sturdy ribbon perfect for creating the Bow with Big Loops, look no further than keleas.com! Our online store offers a variety of high-quality ribbons in different widths and textures, ensuring you find the perfect ribbon for your project. Crafted with durability and aesthetics in mind, our ribbons provide the ideal foundation for crafting beautiful bows that make a statement. With fast shipping and excellent customer service, keleas.com is your go-to destination for all your crafting needs.
What are some common mistakes to avoid when making a Bow with Big Loops?
When making a Bow with Big Loops, it’s important to avoid common mistakes that can affect the appearance and stability of your bow. One mistake to avoid is using a ribbon that is too thin or flimsy, as this can result in loops that collapse or lose their shape. Also, be cautious not to pull the ribbon too tightly when tying your bow, as this can cause the loops to become misshapen or uneven. Another common mistake is neglecting to fluff and adjust the loops of your bow after securing it, which can result in a less full and beautiful bow. Be mindful of the size and proportions of your bow in relation to your project, as an overly large or small bow can detract from the overall aesthetic.
Learn how to create designs like this one by joining
Kelea’s Design School!
Each month, we have 4 detailed tutorials, including supply lists, tips and tricks, and access to a community of fabulous designers who love to share and help each other.