In this wreath how to video, I will show you how using bright-colored florals isn’t just for summertime! I am going to teach you exactly how to use bright florals in your fall wreath so you can make your very own bright fall wreath this fall!
Are you one of those who think you can only use bright florals for a summer wreath? Let me tell you right here and right now, that is false! Bright florals don’t have to be exclusive to the summer only. There are some beautiful fall colors when those leaves start to change and the air is more crisp.
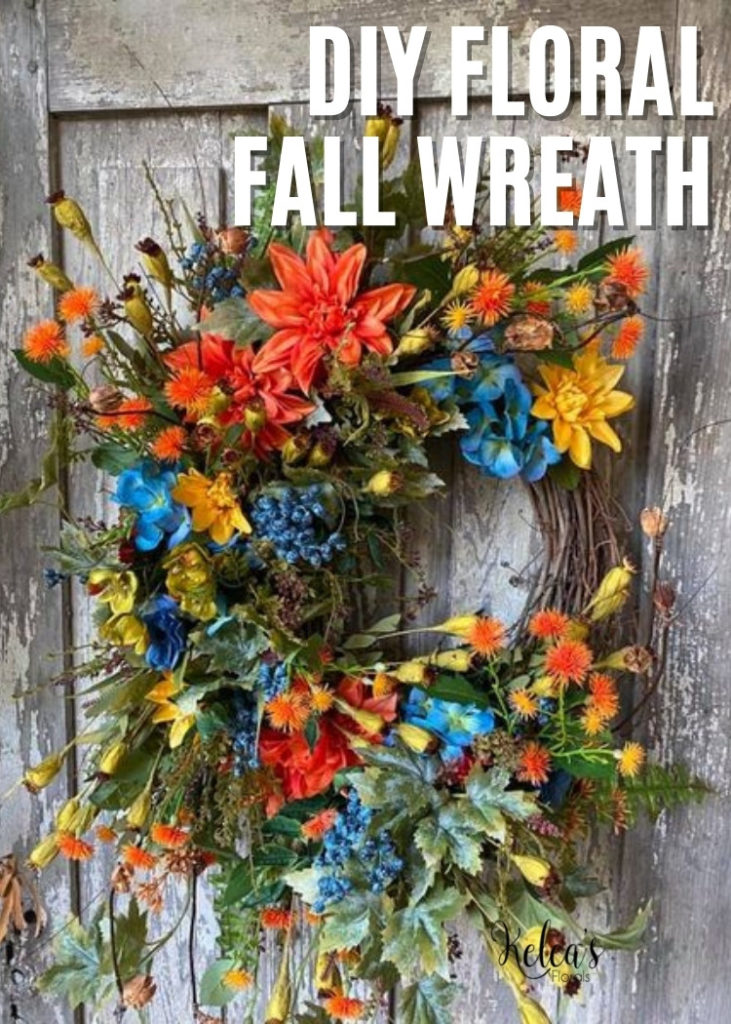
You can see leaves as they turn to change into some bright oranges, reds, and yellows. Just like the ones you see here in this Bright Fall Wreath. Follow along as I walk you through how to create a bright-colored wreath for fall, using muted greenery and other natural embellishments. Are you ready to have some fun with flowers? I know I am. Let’s get started.
Bright Fall Wreath Tutorial
Is it corny to start out by saying, “I have FALLen for this wreath,” y’all? If it is, I don’t even care. I just love it so much. The bright colors from the orange daisies, the dry yellow poppy pods, or even the bluest of blueberries… It is just so pretty.
This wreath may look difficult to create with all of these beautiful florals and greenery used throughout. It may seem like you aren’t sure where to start. Don’t worry friends that is why you are here! You are ready and willing to learn how to craft your own front door fall wreath.
By the end of making this Bright Fall Wreath, you might even feel ready to take on a wreath with a bow. Hey, or even make one with some fun glittery embellishments. Who knows how brave you might feel. Either way, I am happy to support and encourage you along the way. I have tons of step-by-step tutorial videos and blog posts to help you. Be sure to check them out.
If you are looking for more help with your wreath designs be sure to sign up for Kelea’s Design School! I’d love to have you there!
Ingredients
Blueberry Stem
Fall Boll Pod Stem
Hot Glue Sticks
Directions
- Using your 18” grapevine, add your floral wire wreath hanger up top to prepare. Mount on your workspace for good visual creation.
- Determine a transition point on your grapevine when you will begin to adjust your floral and greenery. One angle will move up, over and around your wreath and then down and around.
- Cut your Green and Red-Brown Maple Hanging Bush into some sections with wire cutters from your main bundle. Work your greenery into your grapevine. Using the angle you place it in to hold it secure, along with some hot glue. Use some faux moss to cover your hot glue if needed.
- Let’s deconstruct and prep our Dahlia Hydrangea Rose Bush. Push up those flowers up to the top and trim from the bundle. Place and sort your florals, so it is easy to work with. This bush was our inspiration piece.
- Working with orange florals first, grab the dahlias. Dip your stems in hot glue. Chunk them in your greenery already placed.
- Next, let’s add our blue florals in around your greenery. Have them complement your orange dahlias. Follow up with your yellow floral bundles. It will look scarce at first, but be patient.
- To fill our grapevine, grab your Burgundy Mixed Autumn Bush. Trim from the main bundle and work sections into your grapevine. Use hot glue to place, popping in and around your florals. Remember to keep your angles going up and down to keep the flow of your grapevine. You will use 2 of these bushes to fill in.
- With your Orange Sweet Daisy Stem, cut a small section to work with. Hot glue ends and place them popping out adding height and dimension. This adds a fun burst of orange to our wreath. Play with the stems of the daisies so they pop up and outward from the grapevine. Use moss to hide any glue showing. I used 3 of these stems.
- Add in more greenery to any holes you might find as you work in your florals. Step back and observe your wreath. Help build your depth and dimension by adding height where needed, or different colors.
- Grab your Blueberry Stem, and trim from the main bundle. Work in some sections popping from behind your bright orange dahlias. Play with placement and have fun with it.
- This wreath is coming along so nicely. To add more of a “dry” look to it, let’s add our Poppy Pods Bush. Place them tucked in amongst your florals adding a bit more fun to your wreath. These will be long, creating more dimension and height. Fluff your florals, stems, etc. to make your wreath look fabulous. I used 2 of these bushes.
- Add greenery where needed as you work.
- Lastly, we will add our Fall Boll Pod Stem. Position your twig stems so they pop out, keeping the flow of your wreath. These stems just complete the look. I love it so much.
- If you want to add a bow to this wreath at your transition point, feel free to do so. I personally like it without.
- Play with your florals so they are popping where they need to, standing out, and looking fabulous.
When you are ready to expand your floral knowledge, come join us in Kelea’s Design School, we’d love to see you bloom


